Mastering Secure Shell is Key
A comprehensive guide to Secure Shell (SSH), a vital protocol for establishing encrypted connections over networks. It details the mechanics of key-based authentication, explaining how a private and public key pair allows for secure access without traditional passwords.
Practical instructions are included for generating keys, installing them on remote servers, and integrating them with platforms like GitHub and GitLab. Beyond basic logins, the source describes how to perform remote command execution and secure file transfers using SCP and SFTP. Finally, it highlights advanced workflows like SSH tunneling, which enables data scientists to access private databases securely through local port forwarding.
Listen to the NotebookLM intro before you start.
Watch these videos to see the use of SSH keys in action.


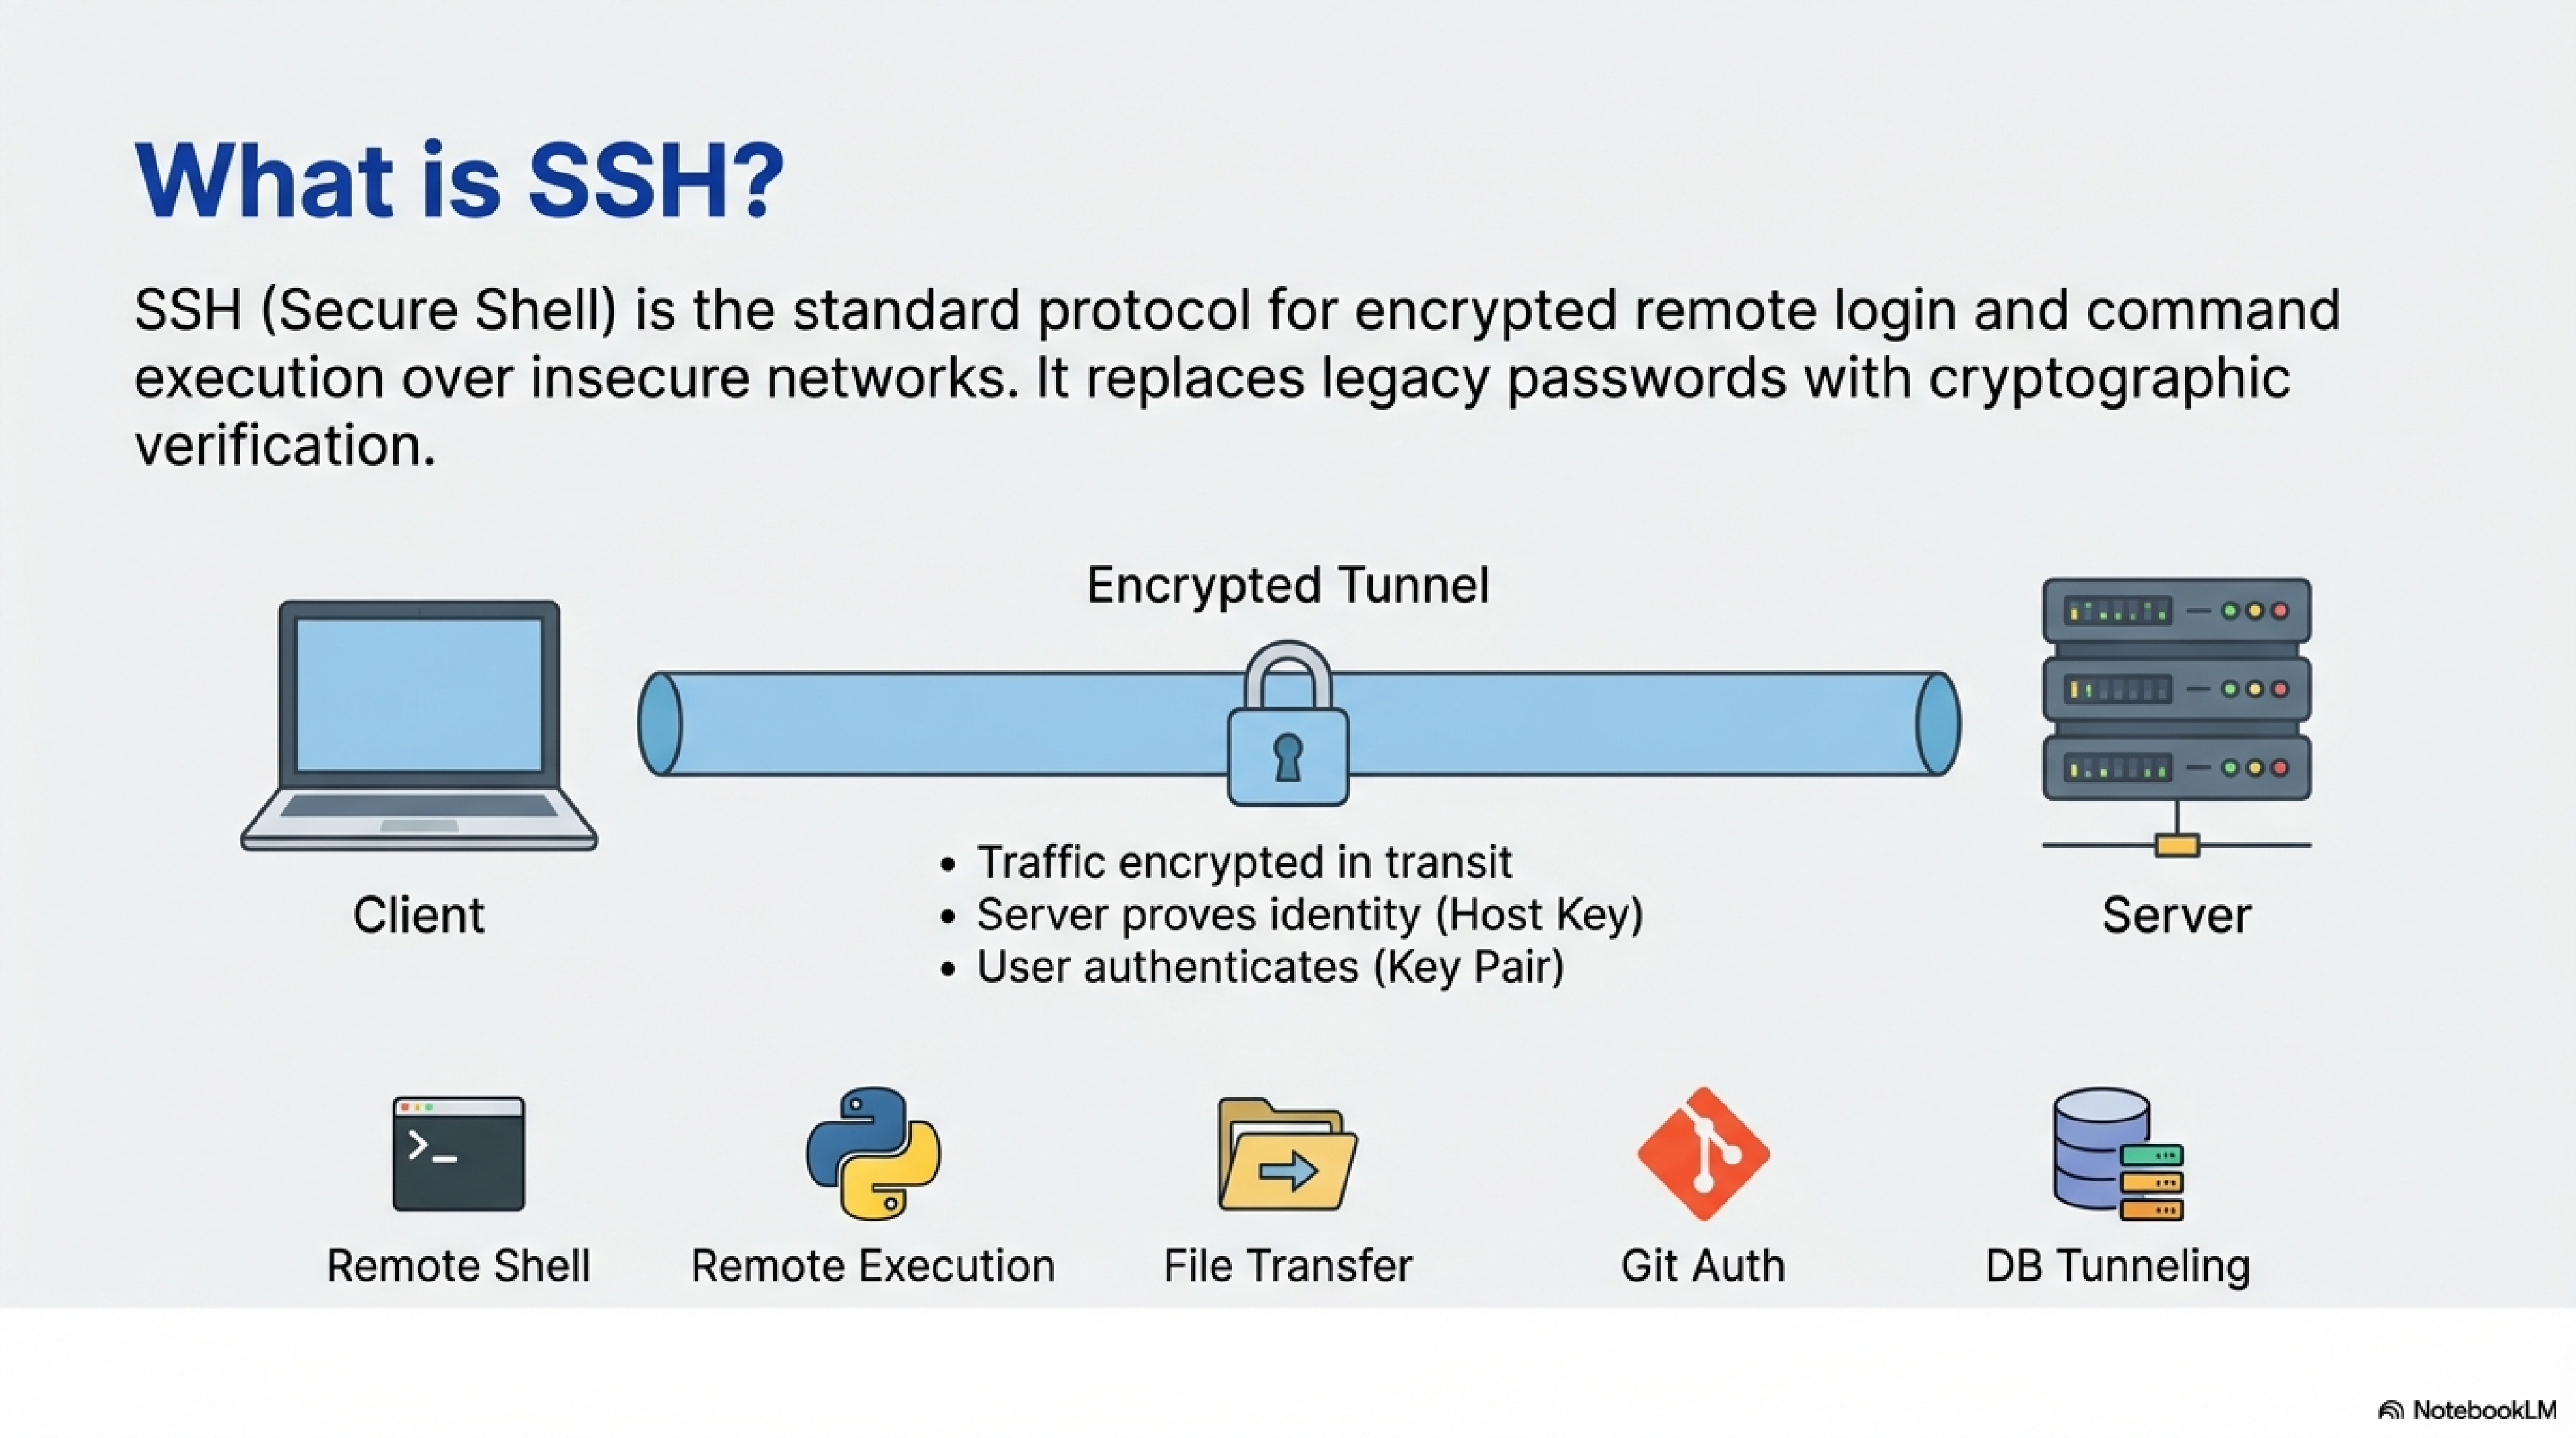
When you connect with SSH:
- Your client and the server negotiate encryption and establish a shared session key, so all traffic is encrypted in transit.2
- The server proves its identity with its host key, which your client stores and checks on later connections.3
- You authenticate as a user, either with a password or with an SSH key pair.1
For data scientists, SSH is the standard way to:
- Get a remote shell on Linux servers.
- Run commands and scripts remotely (e.g.,
ssh server 'python script.py'). - Transfer files with SCP or SFTP.
- Authenticate to Git servers (GitLab, GitHub).
- Create tunnels to internal resources like databases.
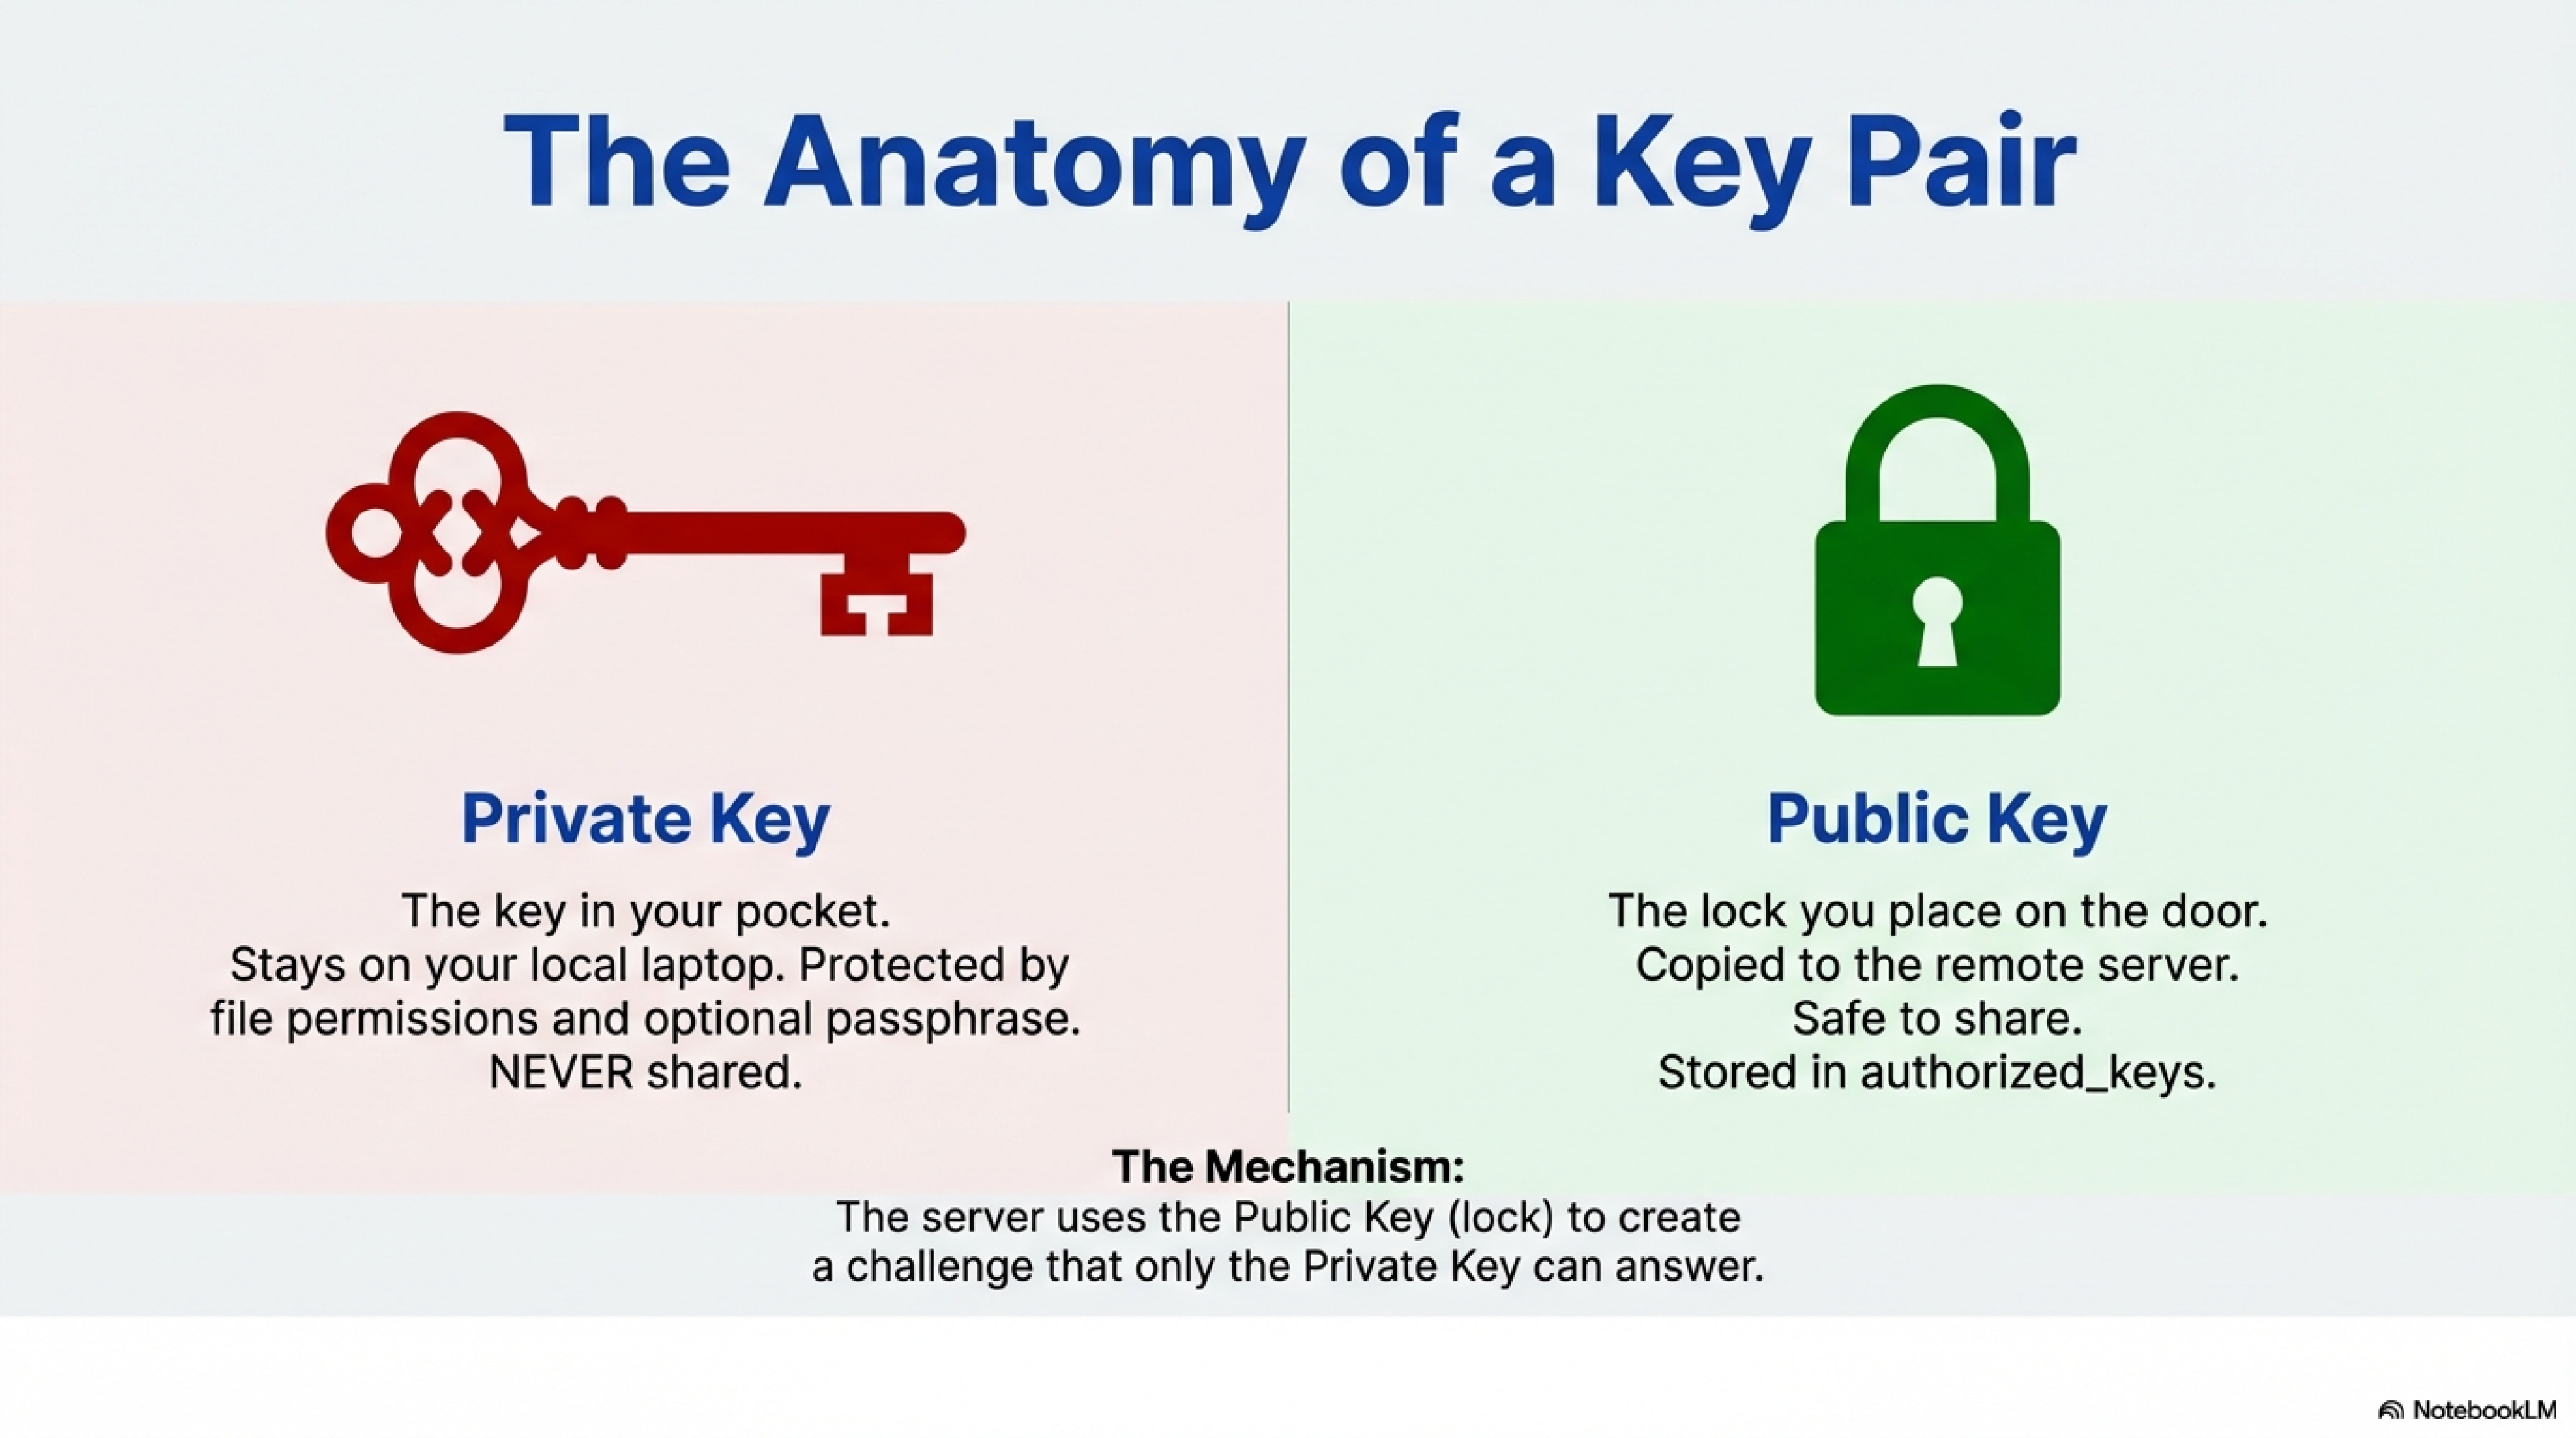
An SSH key pair is two mathematically related keys: a private key and a public key.41
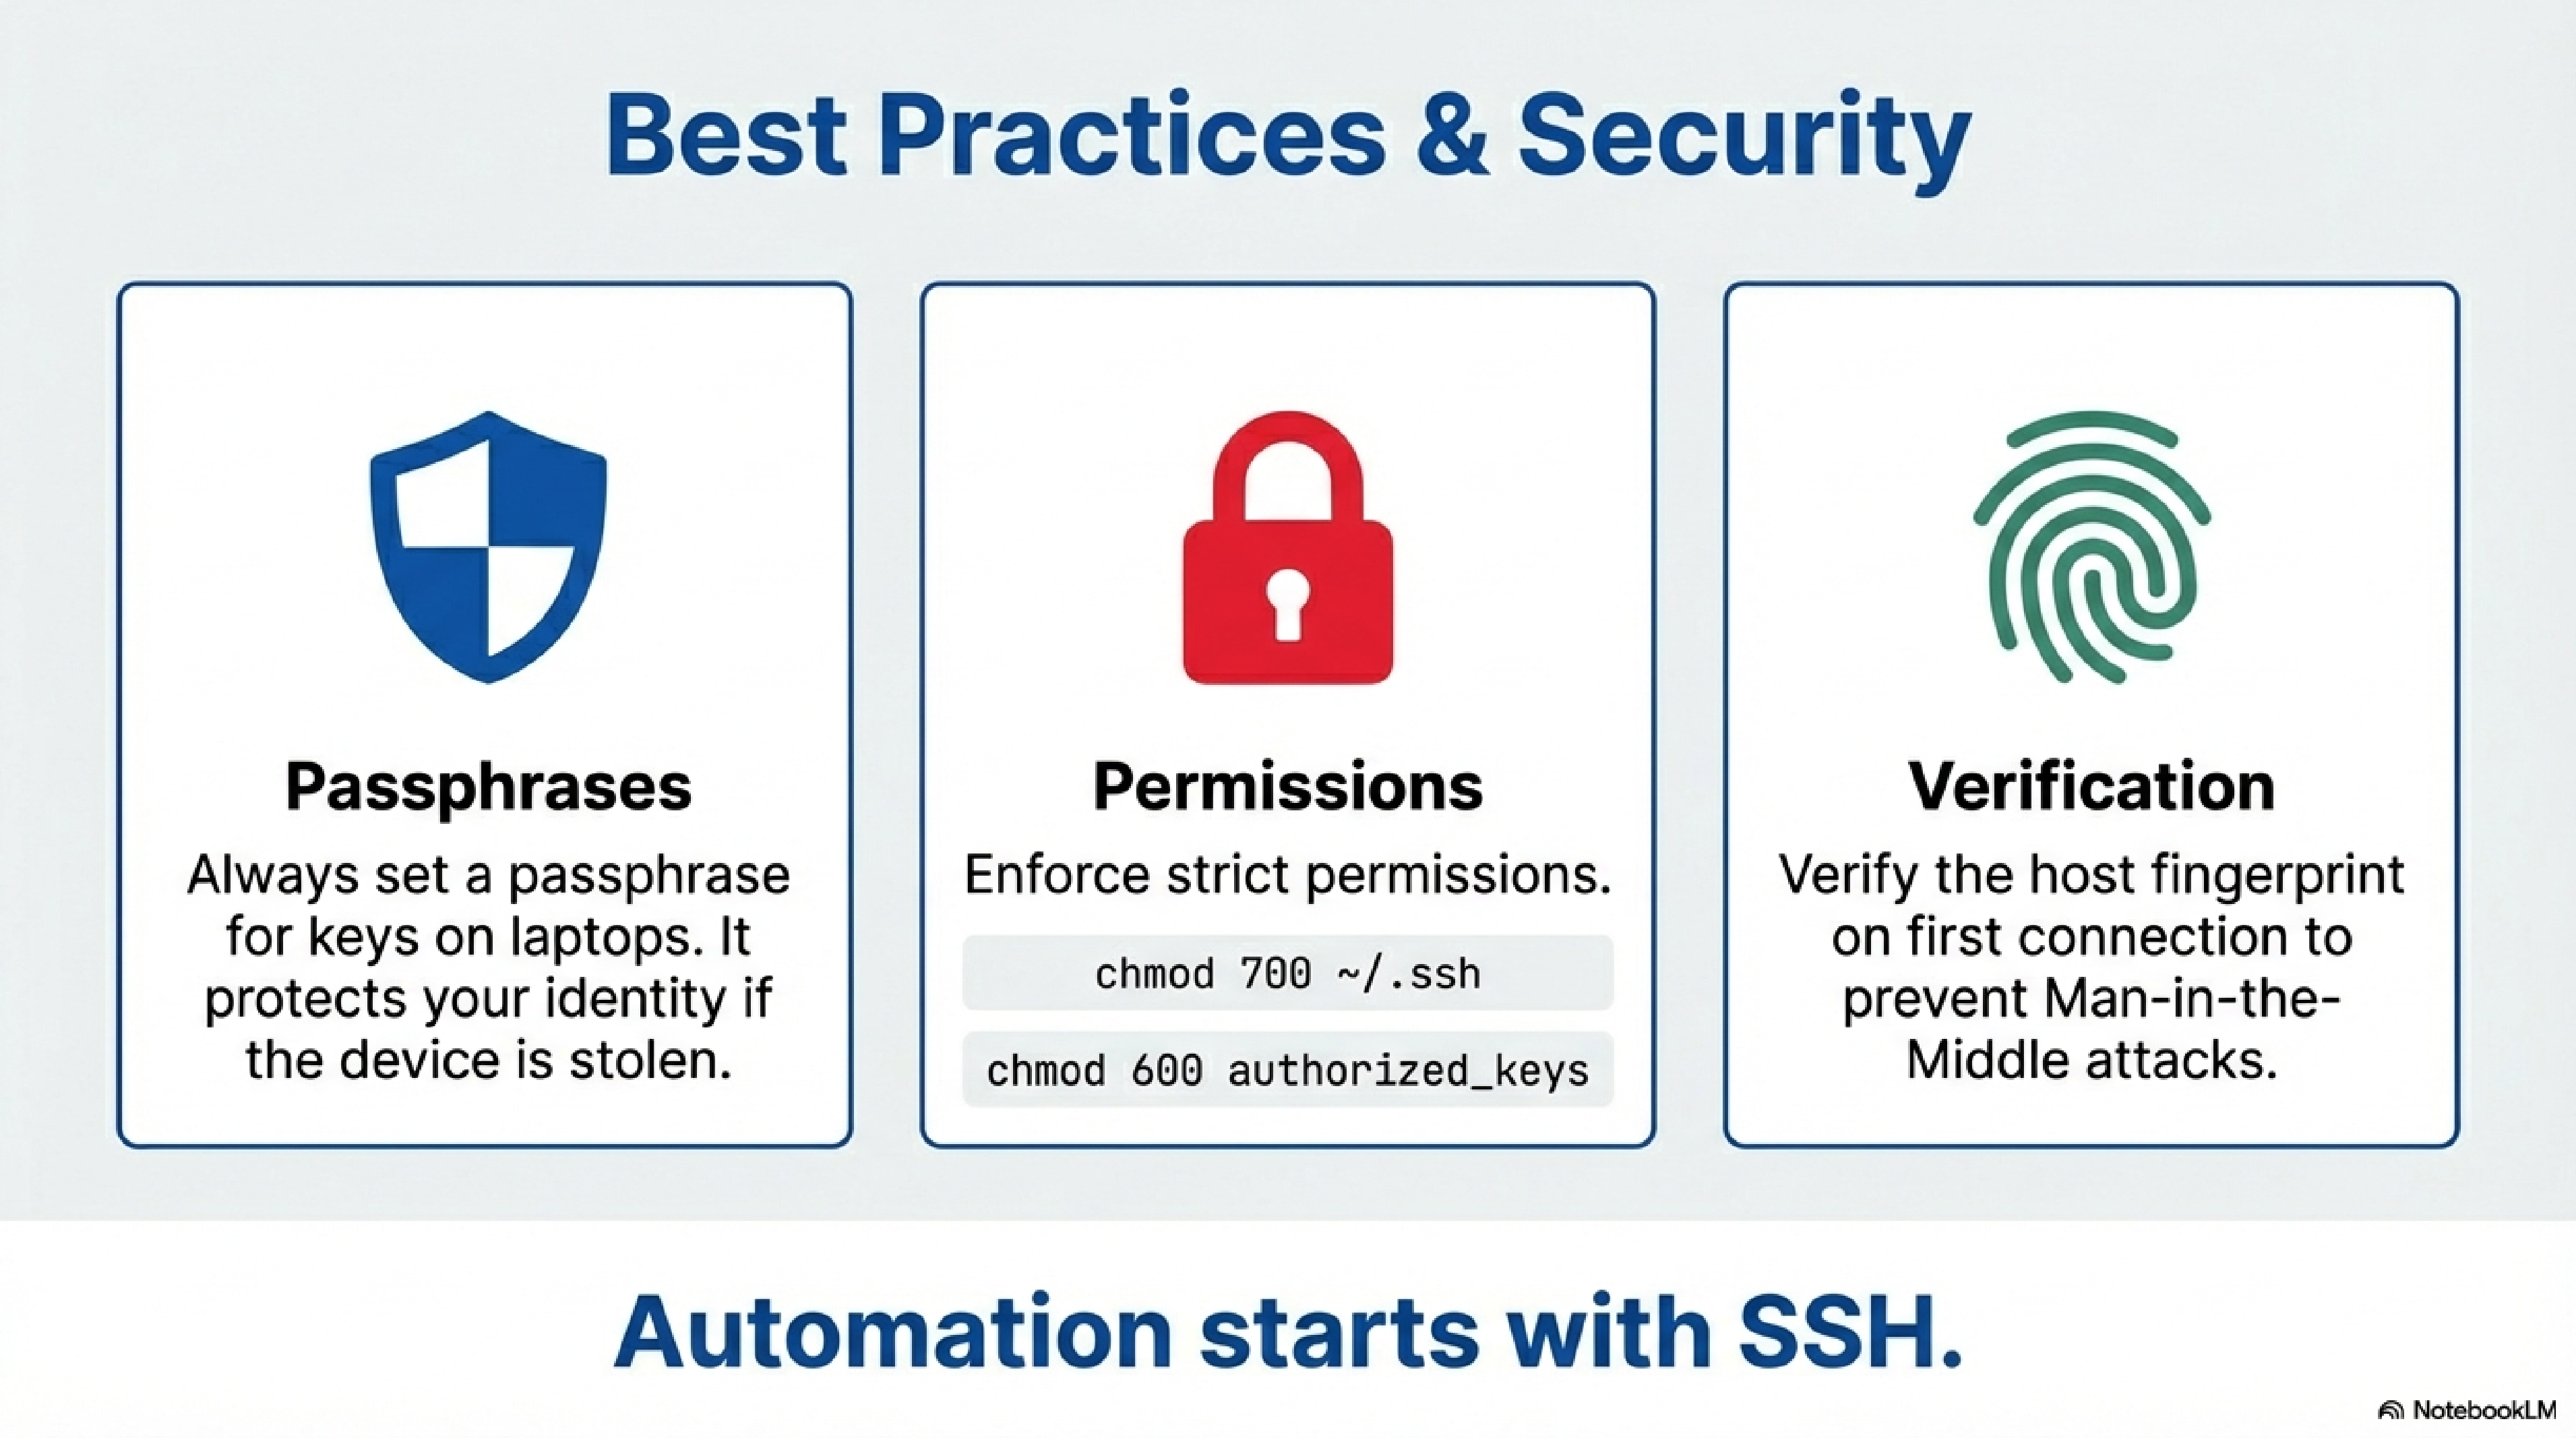
- The private key stays on your laptop or workstation; it must be kept secret and protected by file permissions and optionally a passphrase.41
- The public key is safe to share and is copied to each remote account or service you want to access.41
In key-based authentication:
- You start an SSH connection to
user@server. - The server checks whether your public key is listed in that account’s
~/.ssh/authorized_keysfile.5 - If it is, the server sends an encrypted challenge that only someone with the matching private key can answer correctly.2
- Your client proves possession of the private key, and the server grants access without asking for the account password.52
Each user account on each physical computer (your laptop, a VM, etc.) needs its own key pair and must share its public key with the remote systems it will access.54
You typically do this once per machine or per security context.
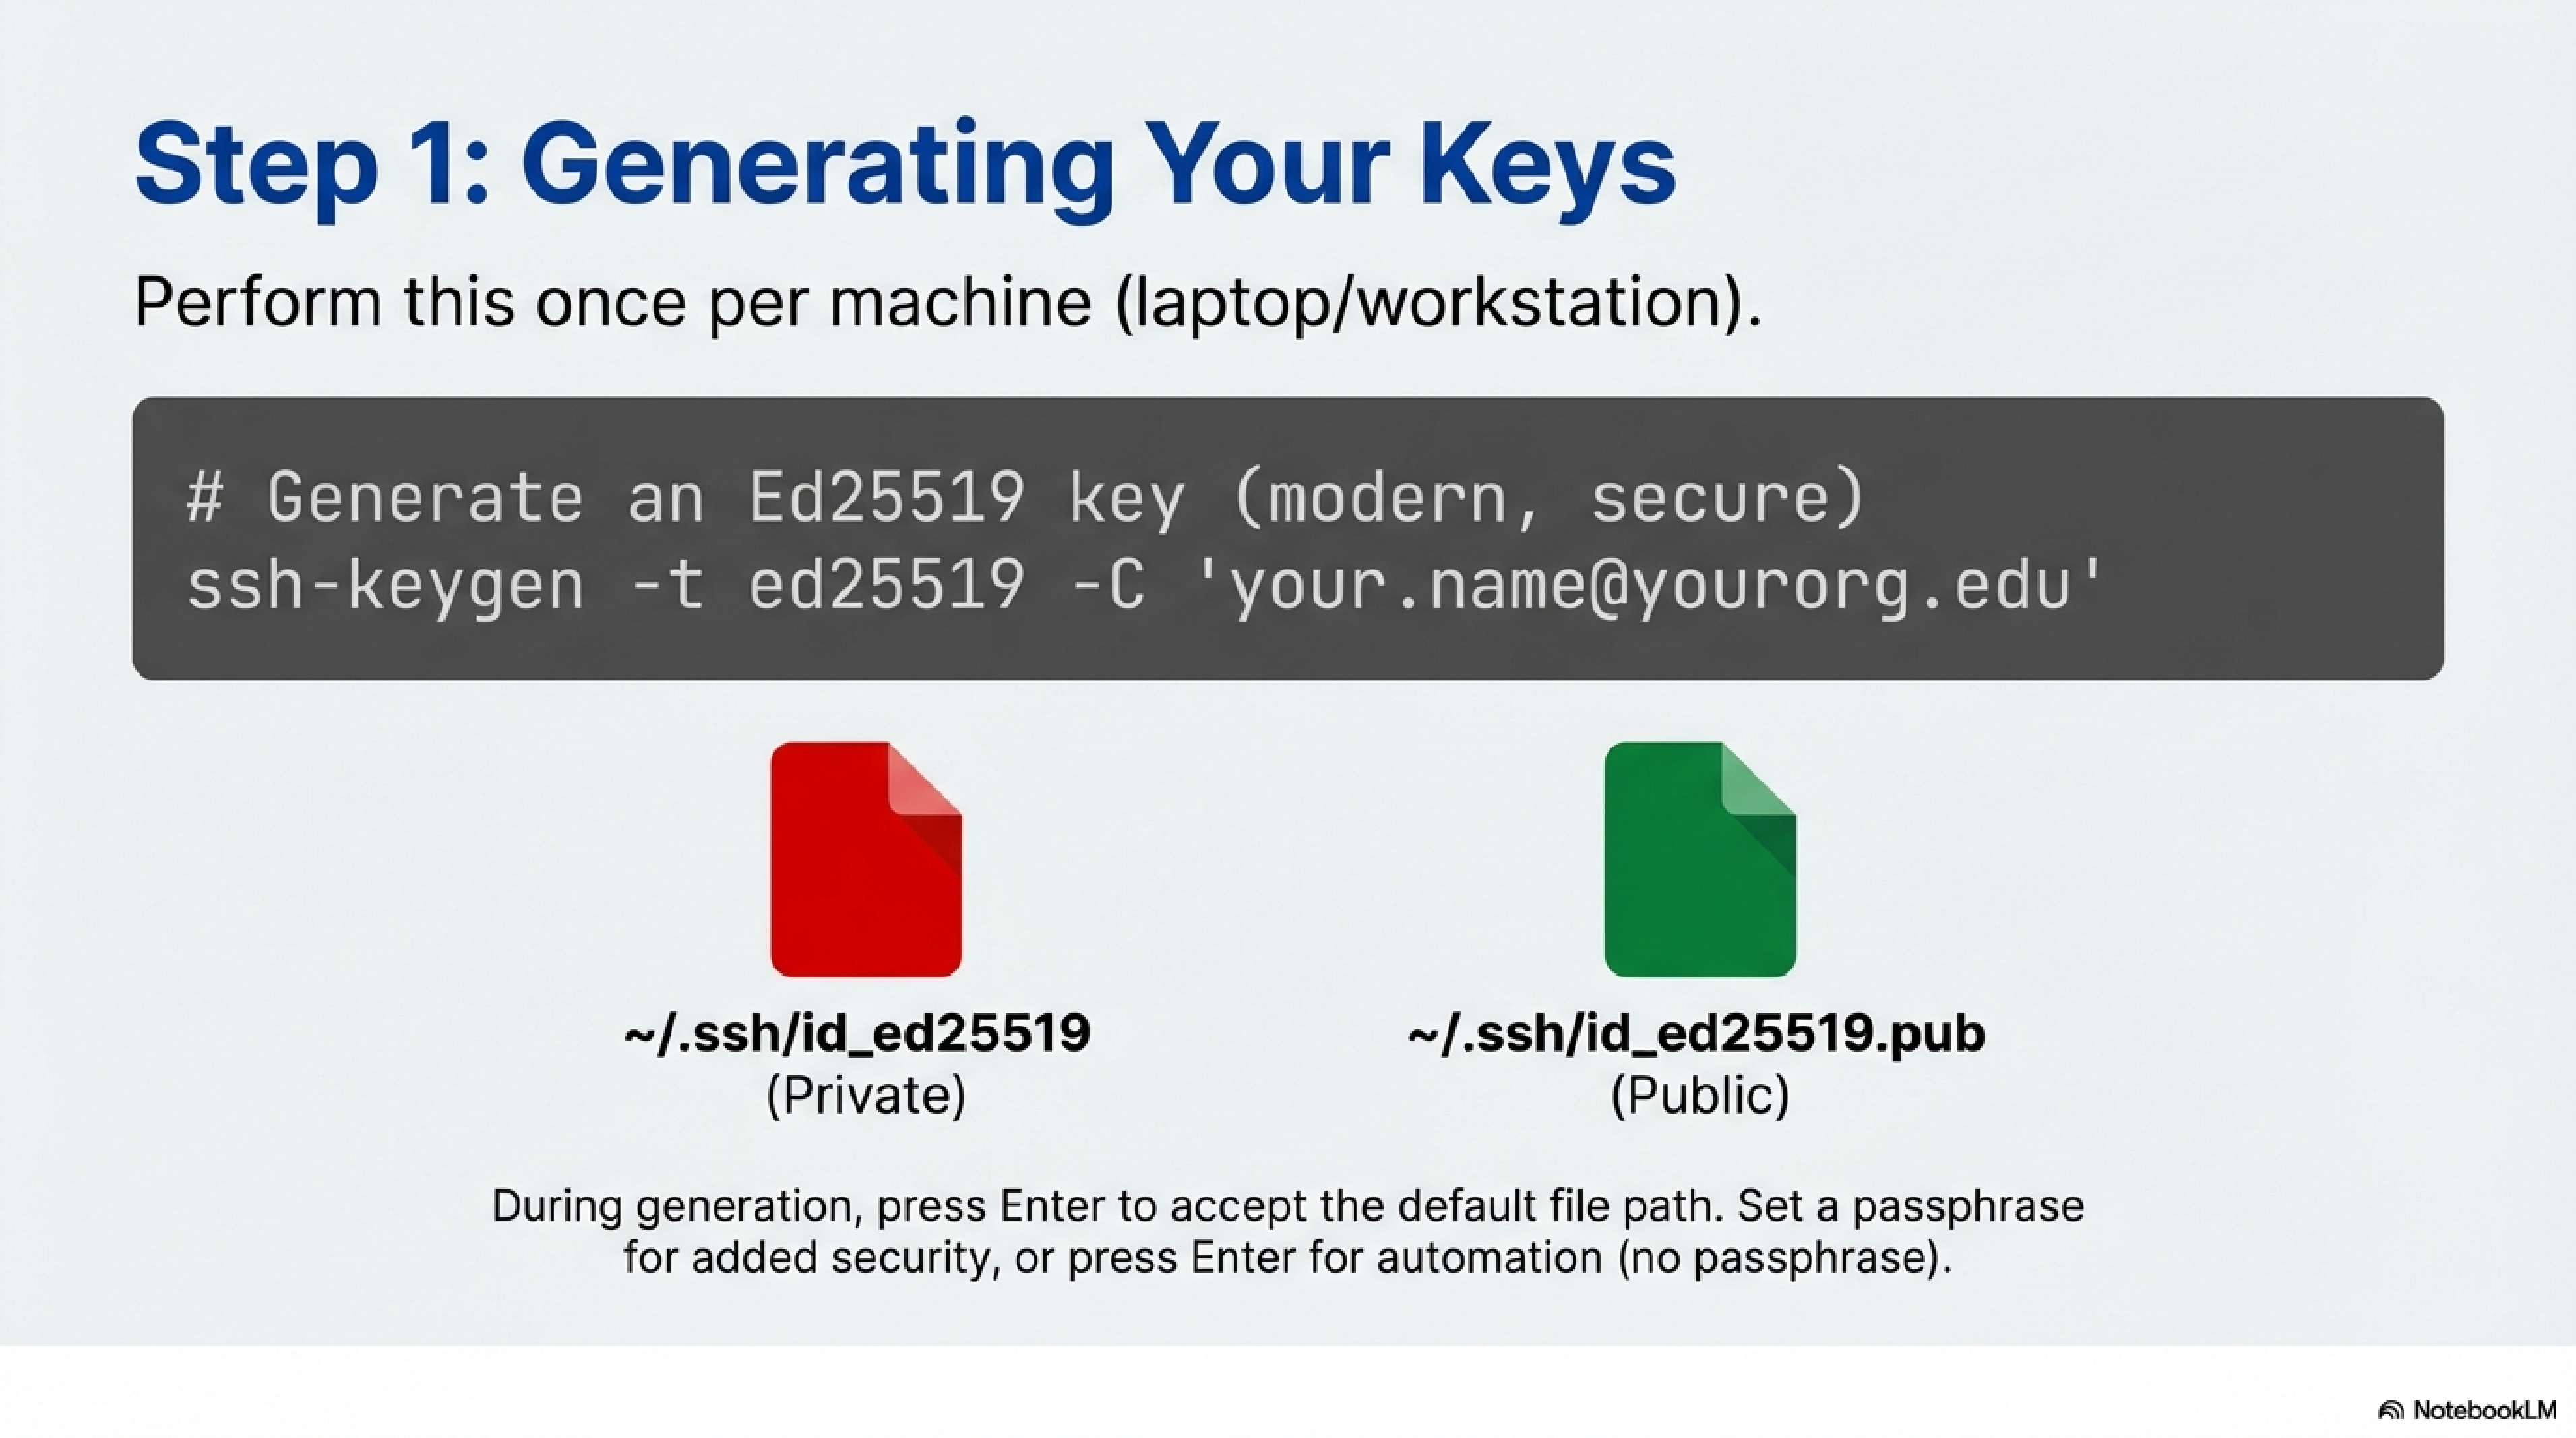
On Linux, macOS, or Git Bash/WSL on Windows:
- You open a terminal.
- You enter:
ssh-keygen -t ed25519 -C "your.name@yourorg.edu"
If ed25519 is not supported, use -t rsa -b 4096 instead.6
3. When prompted for a file, you press Enter to accept the default ~/.ssh/id_ed25519 (or id_rsa).6
4. When prompted for a passphrase, you either:
- Enter a passphrase (recommended for laptops), or
- Press Enter for no passphrase (less secure but can be convenient for automation).6
This creates:
- Private key:
~/.ssh/id_ed25519 - Public key:
~/.ssh/id_ed25519.pub
Depending on you system and which encryption method you choose, the names may differ. However, they usually follow the format id##### for the private, and id#####.pub for the public key. If you choose against the default name and pick your own, you may have to specify the key with certain commands.
You can view your public key with:
cat ~/.ssh/id_ed25519.pub
You will copy-paste or upload this .pub file to servers and Git services.
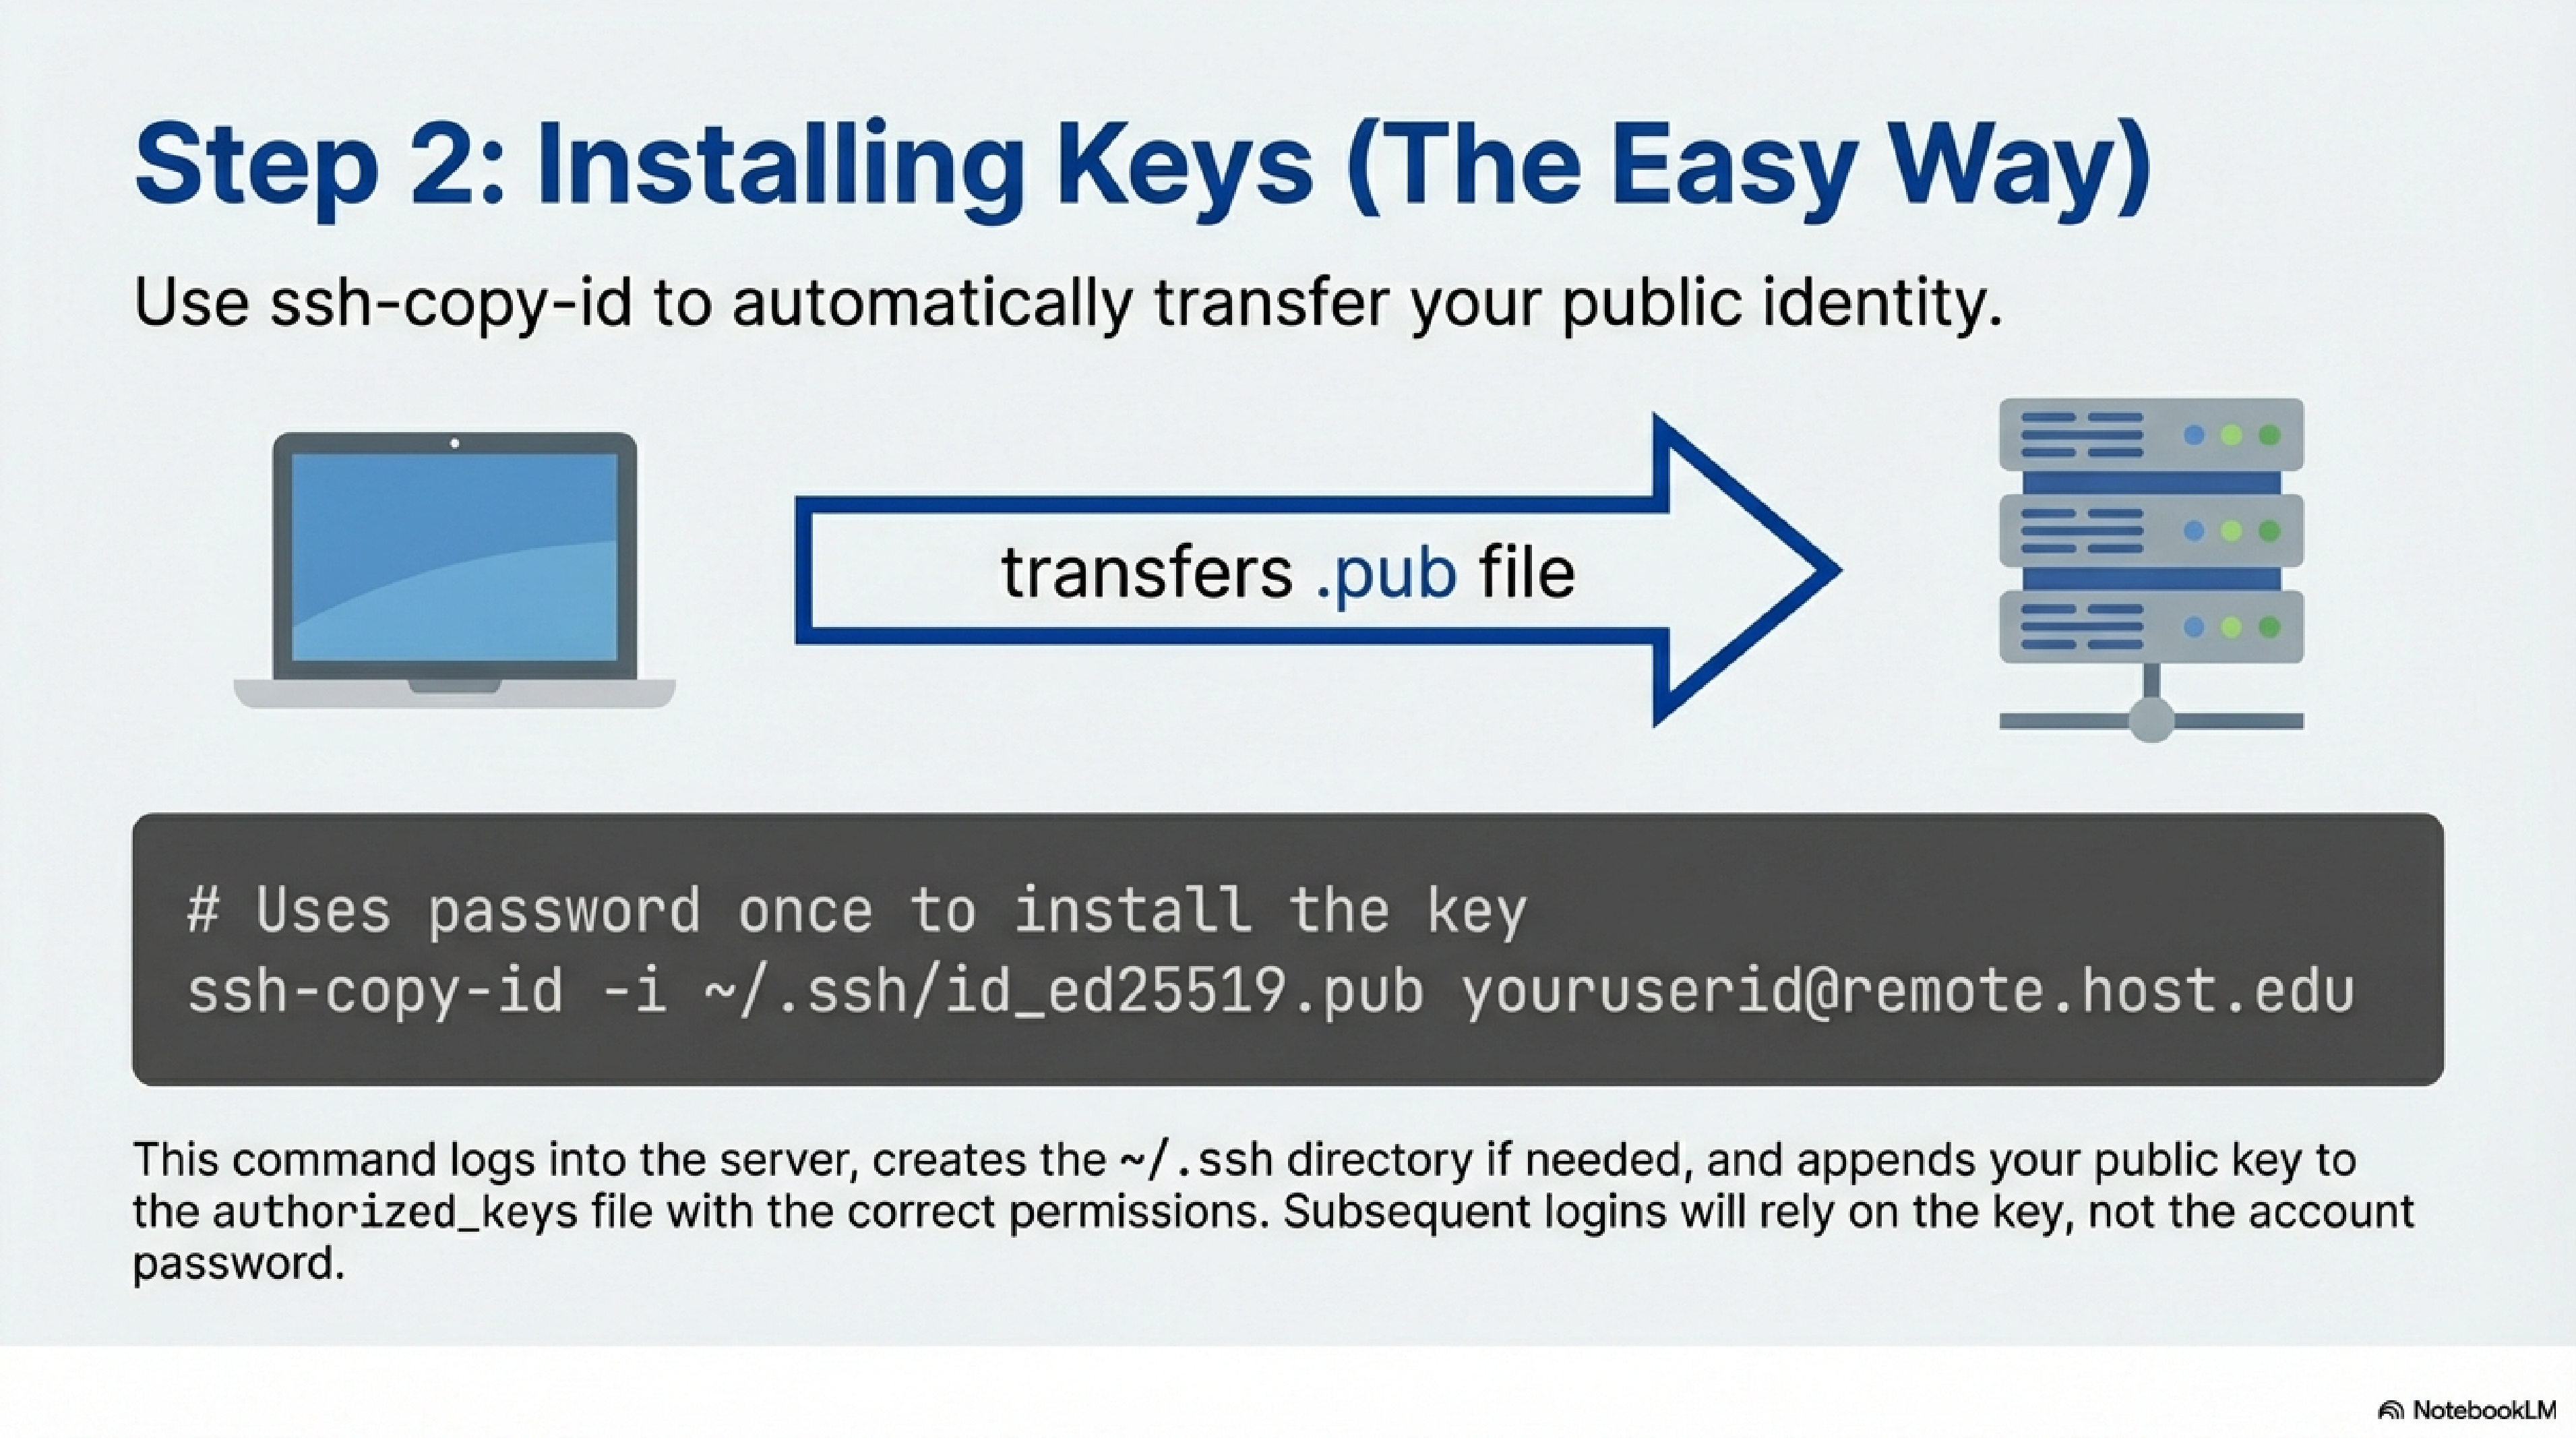
The goal is to add your public key to ~/.ssh/authorized_keys on the remote account so you can log in without a password.75
If ssh-copy-id is available (all Linux/macOS, some Windows environments):
- You ensure you can log in with your password at least once (this is needed to install the key).
- You enter:
ssh-copy-id -i ~/.ssh/id_ed25519.pub youruserid@remote.host.edu
This logs into the server, creates ~/.ssh if needed, and appends your public key to ~/.ssh/authorized_keys with correct permissions.87
After that:
ssh youruserid@remote.host.edu
should log you in without asking for the account password (it may ask for your key passphrase instead).
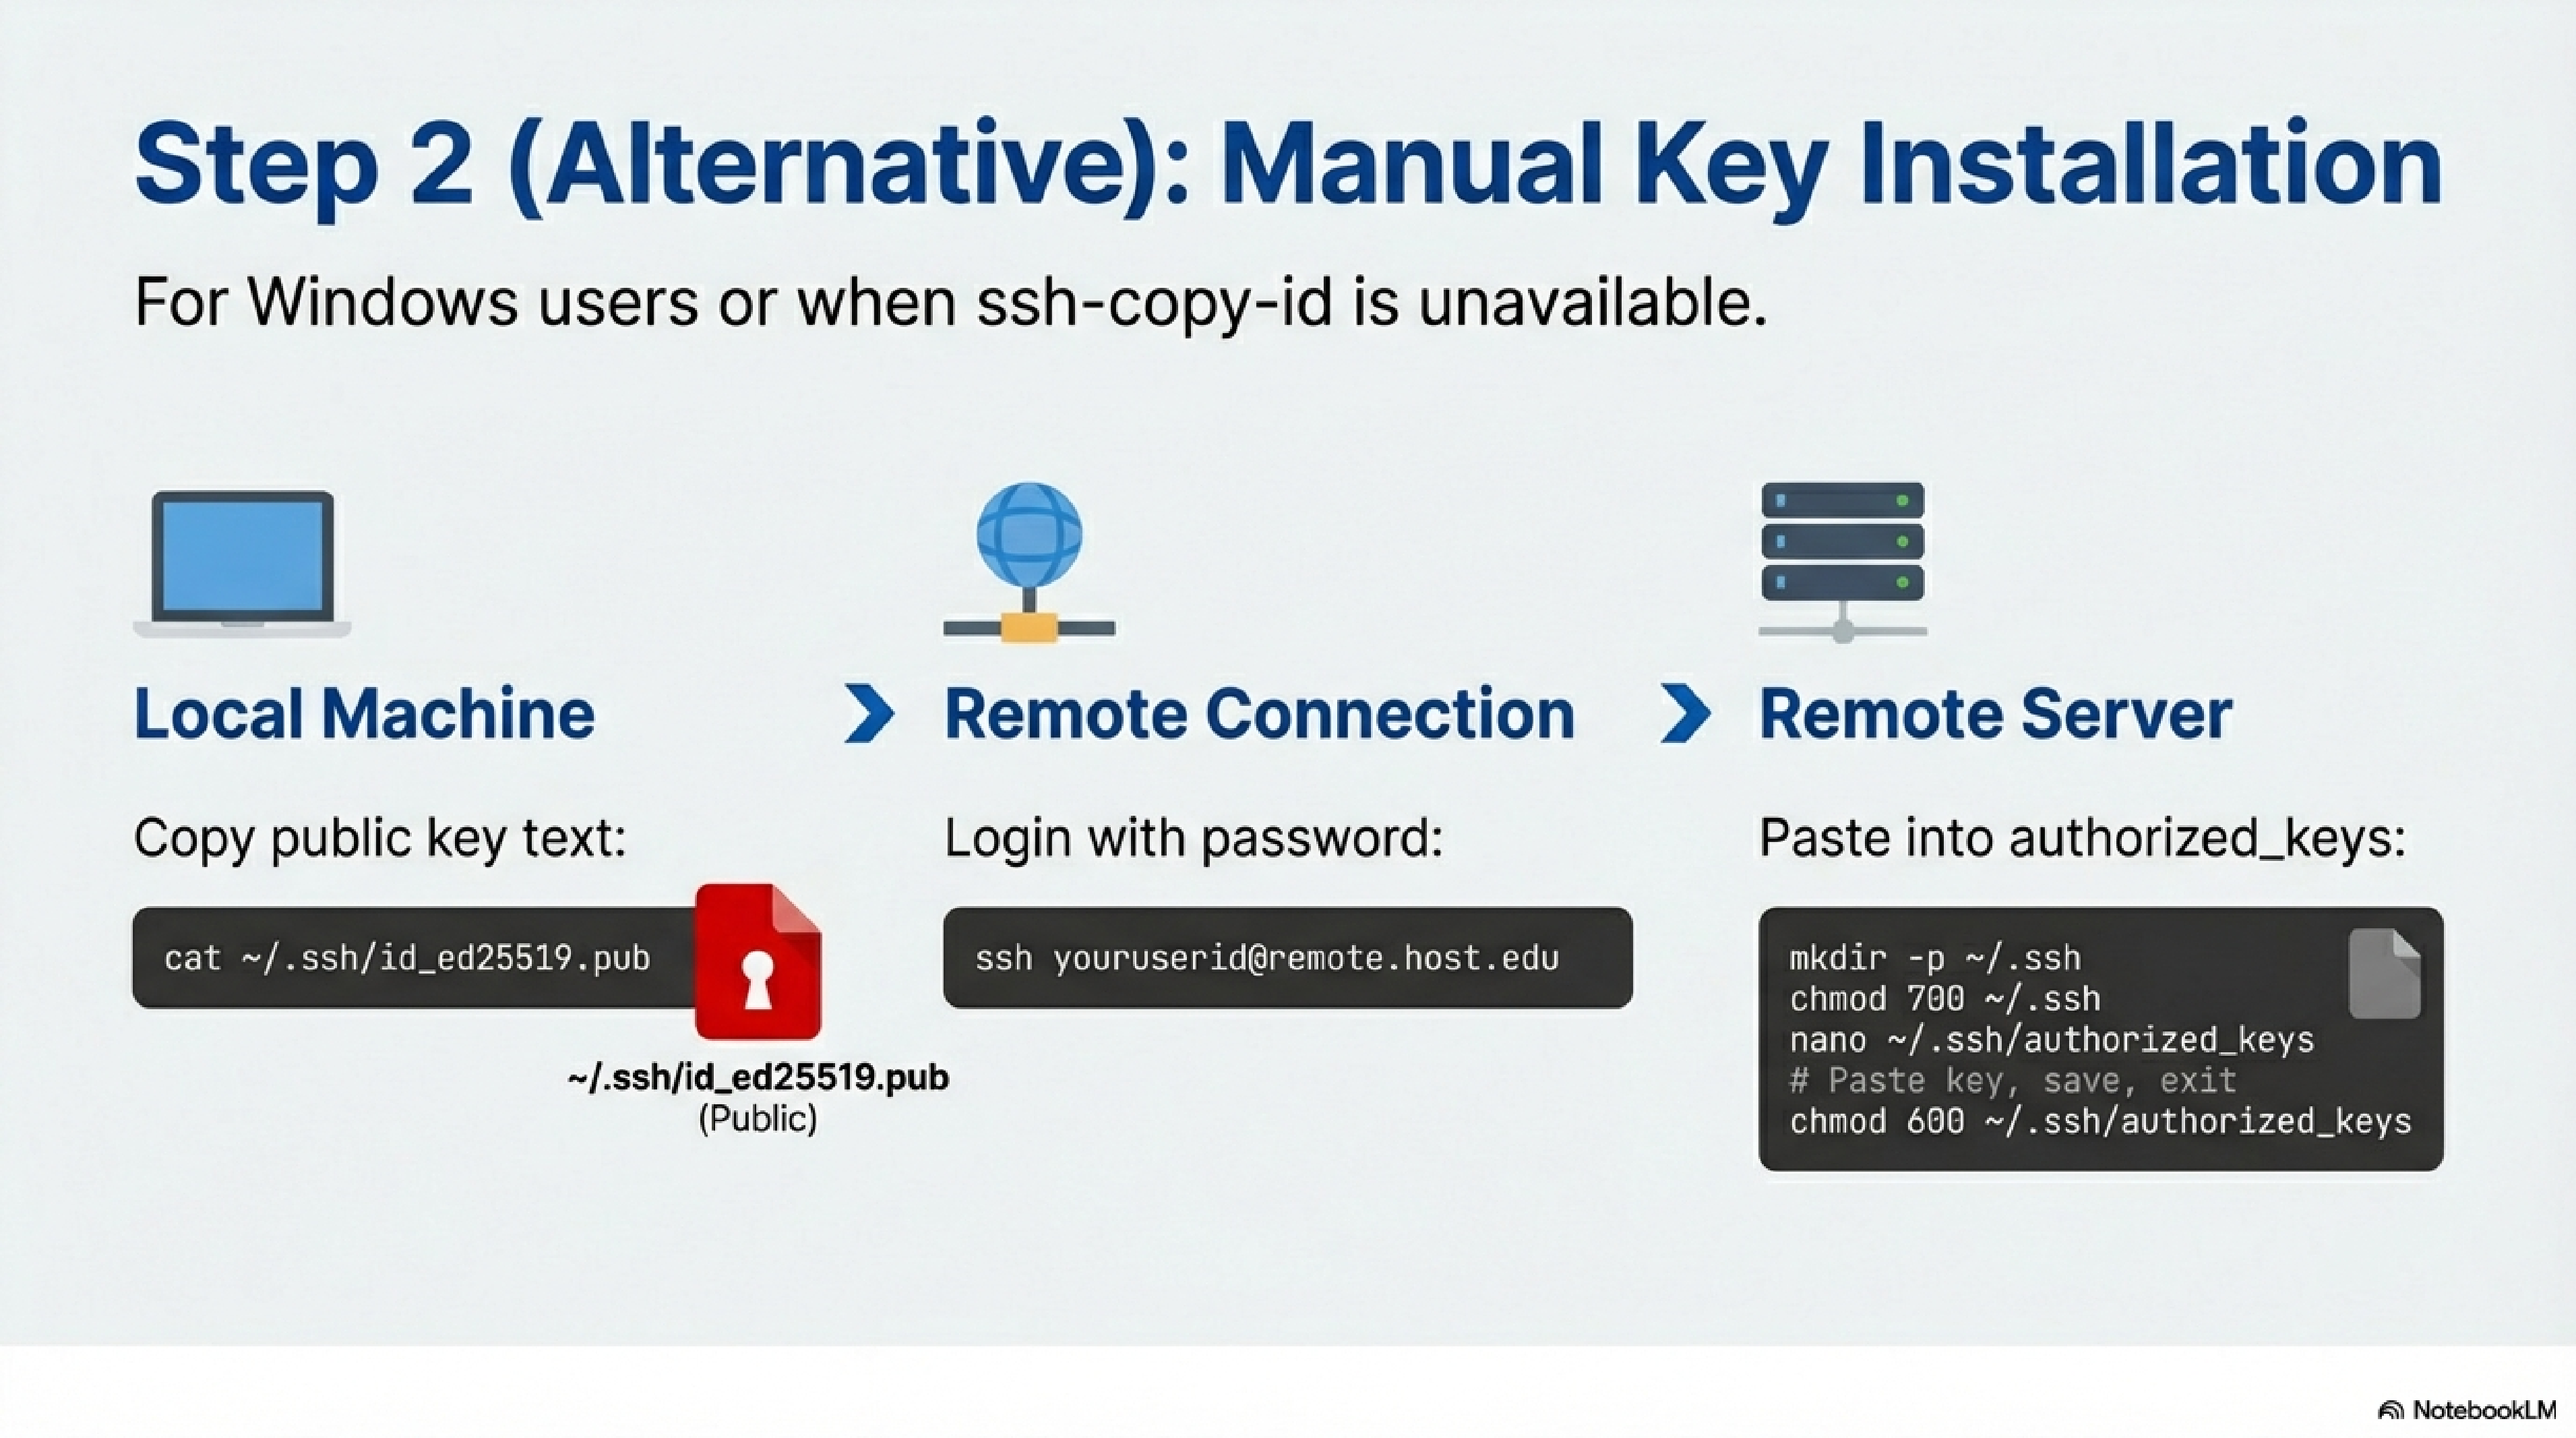
If ssh-copy-id is not available, you manually append your public key to authorized_keys:
- On your local machine, you display and copy your public key:
cat ~/.ssh/id_ed25519.pub
- You SSH into the remote server with your password:
ssh youruserid@remote.host.edu
- On the remote server, you ensure
.sshexists with correct permissions:
mkdir -p ~/.ssh
chmod 700 ~/.ssh
- You open (or create)
authorized_keysand paste your public key at the end. Examples:- Using
nano:
- Using
nano ~/.ssh/authorized_keys
- Or append via echo (if you have the key in a file on the remote):
cat id_ed25519.pub >> ~/.ssh/authorized_keys
- You set permissions:
chmod 600 ~/.ssh/authorized_keys
From now on, you can log in with:
ssh youruserid@remote.host.edu
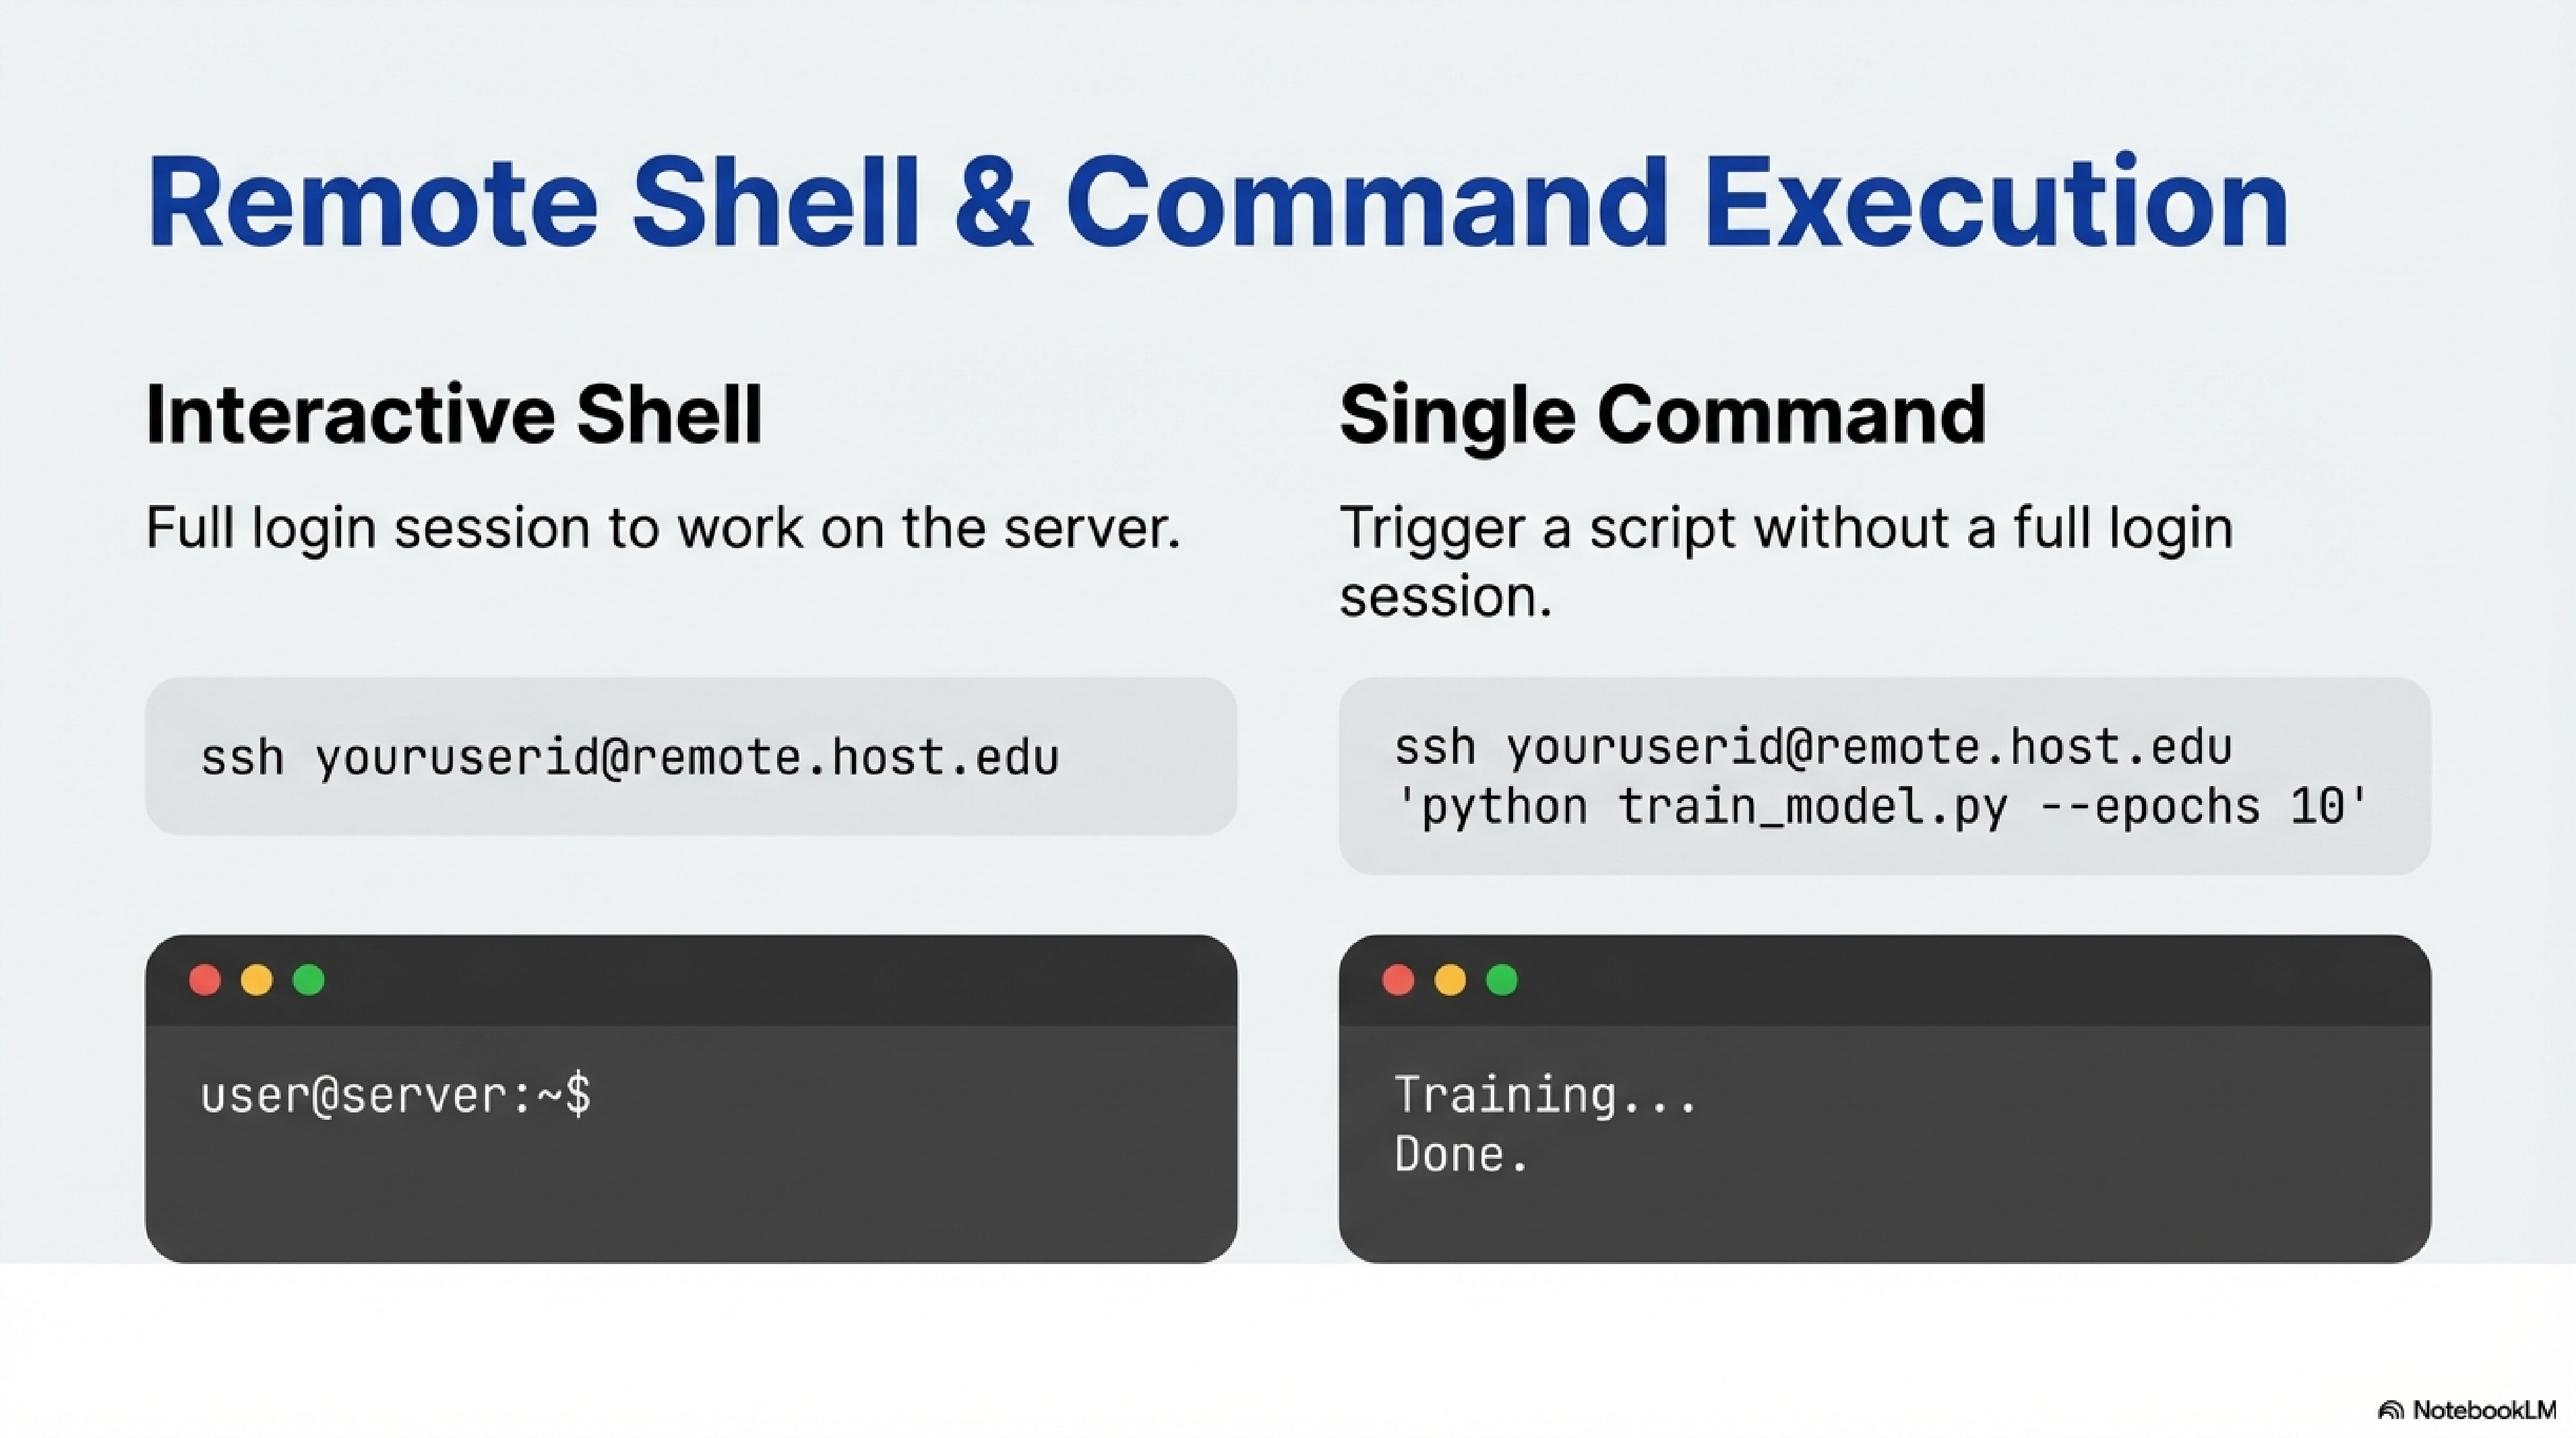
- Interactive shell:
ssh youruserid@remote.host.edu
- Run a single command:
ssh youruserid@remote.host.edu 'python train_model.py --epochs 10'
This is handy for running jobs or quick checks from your laptop.
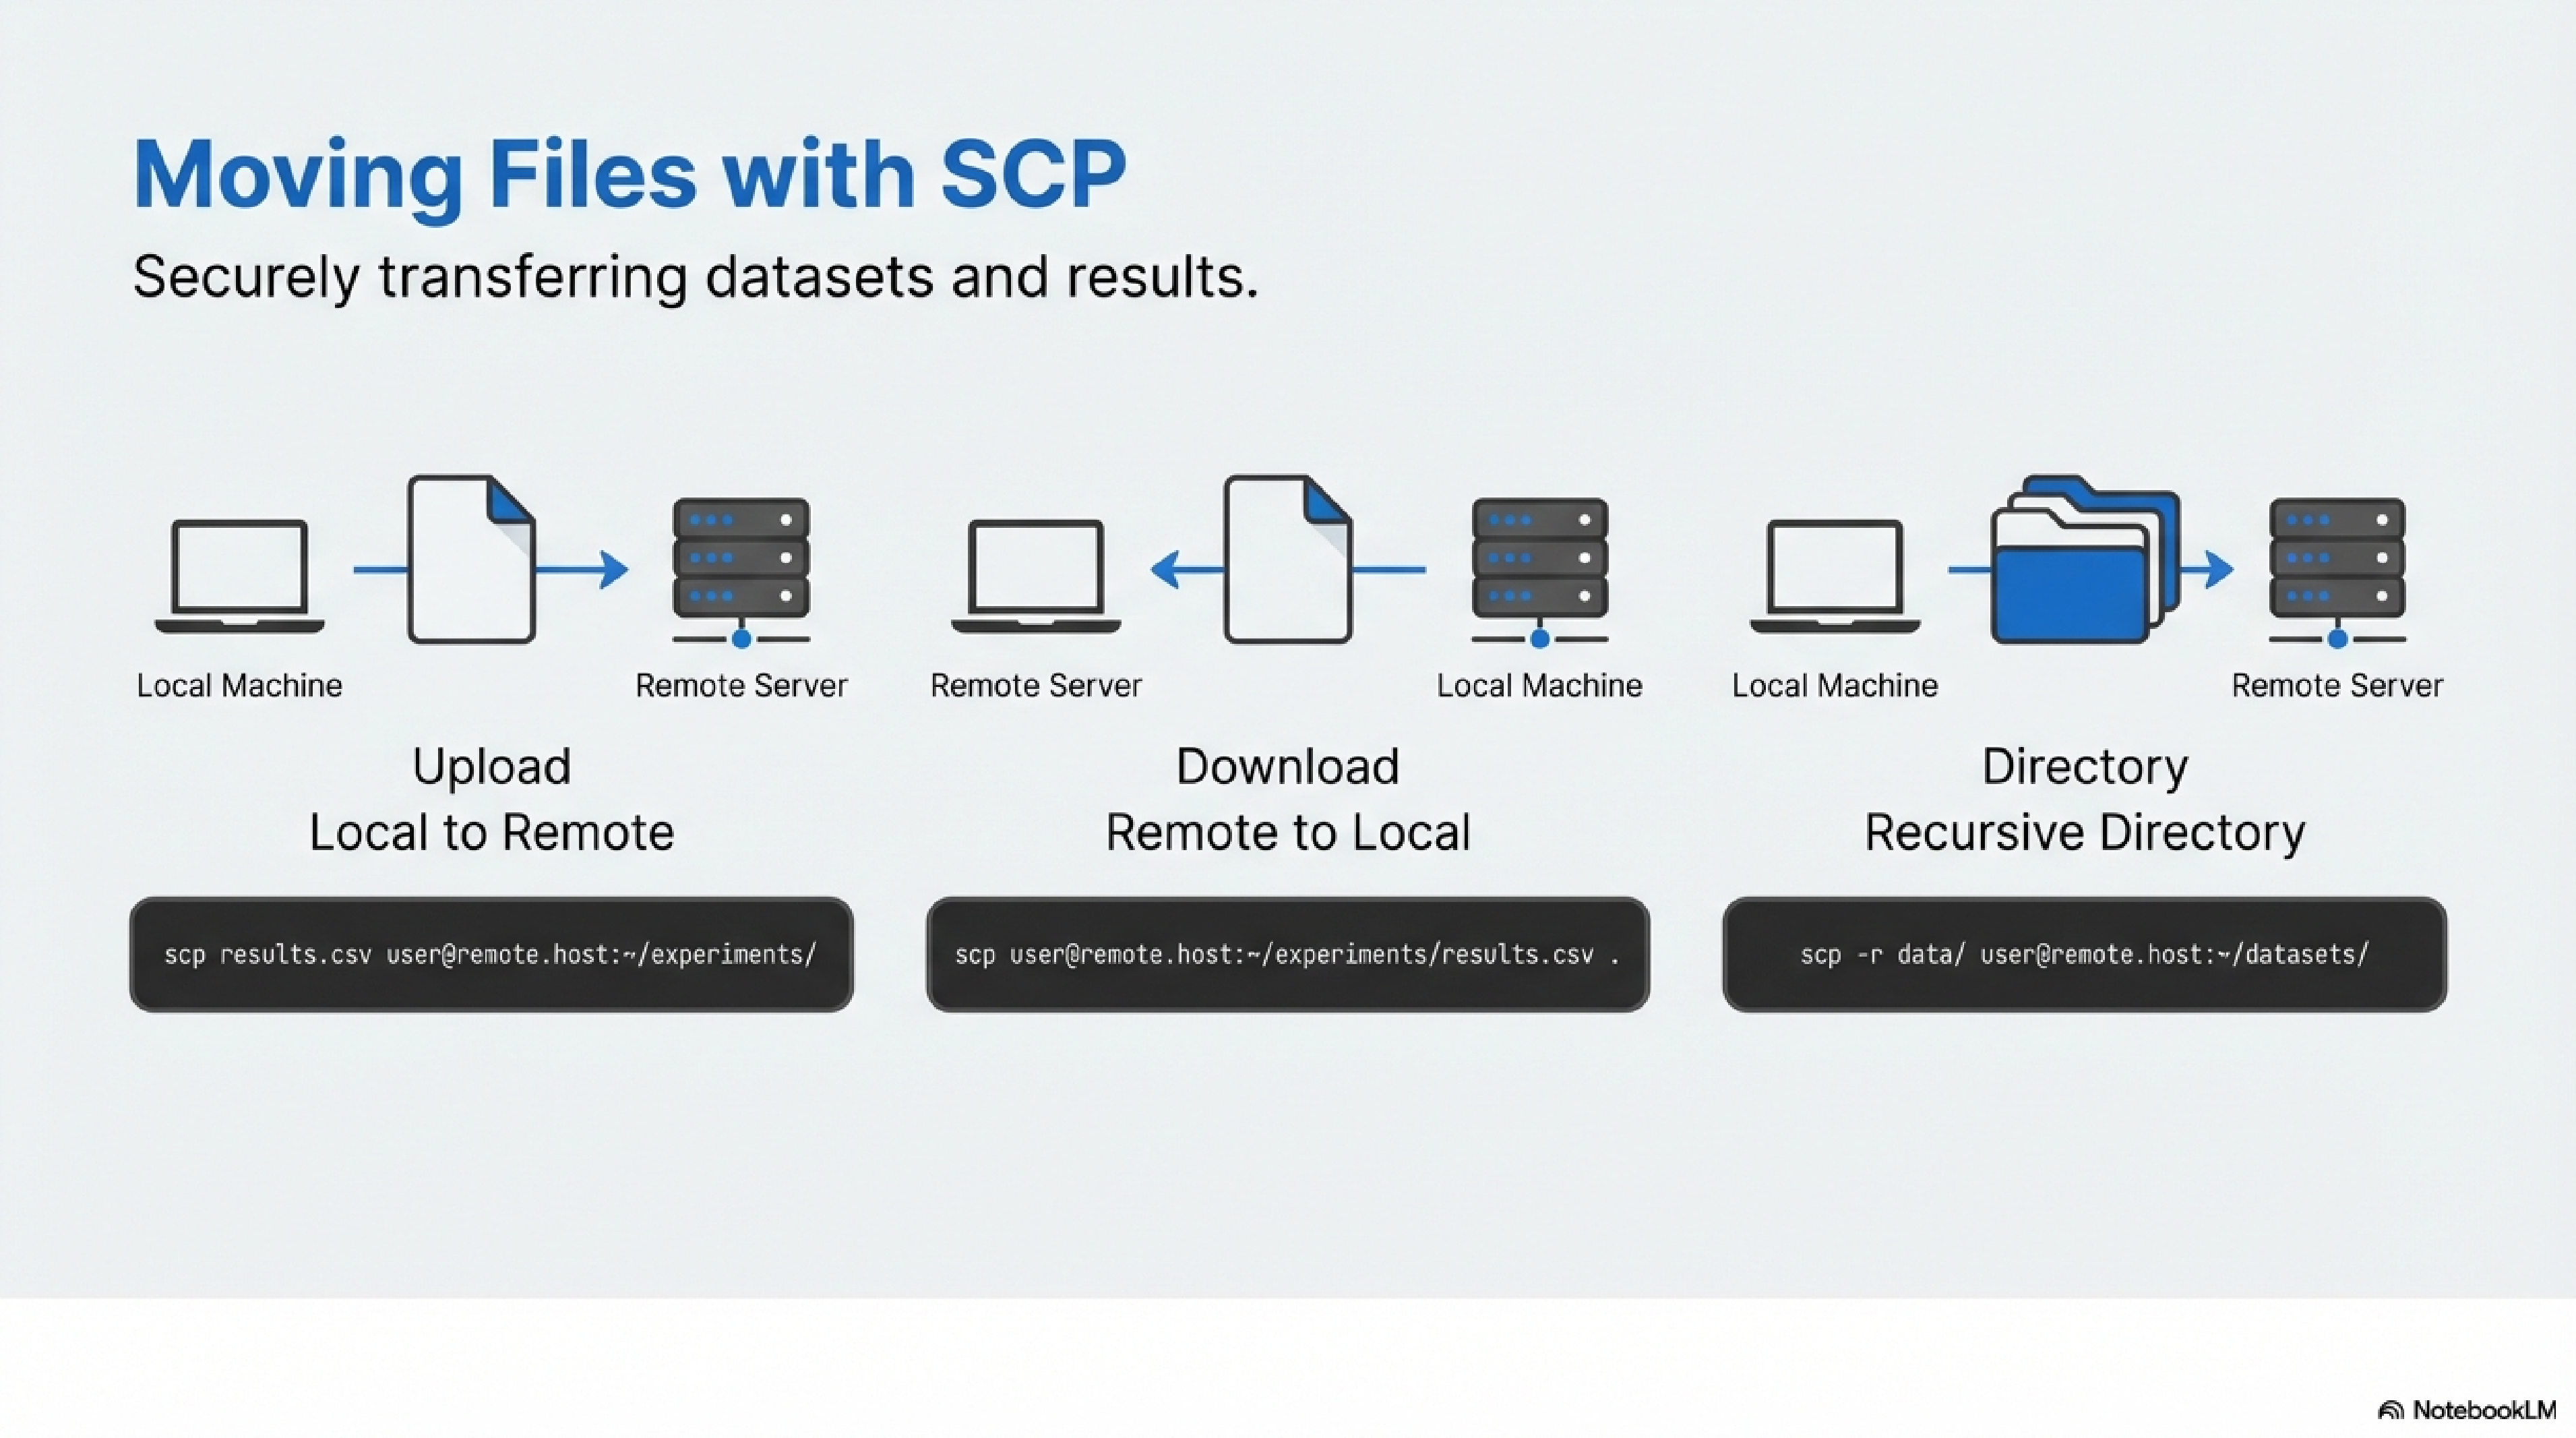
SCP (Secure Copy) transfers files over SSH.1
- Copy local file to remote directory:
scp results.csv youruserid@remote.host.edu:~/experiments/
- Copy remote file to local:
scp youruserid@remote.host.edu:~/experiments/results.csv .
- Copy directories recursively:
scp -r data/ youruserid@remote.host.edu:~/datasets/
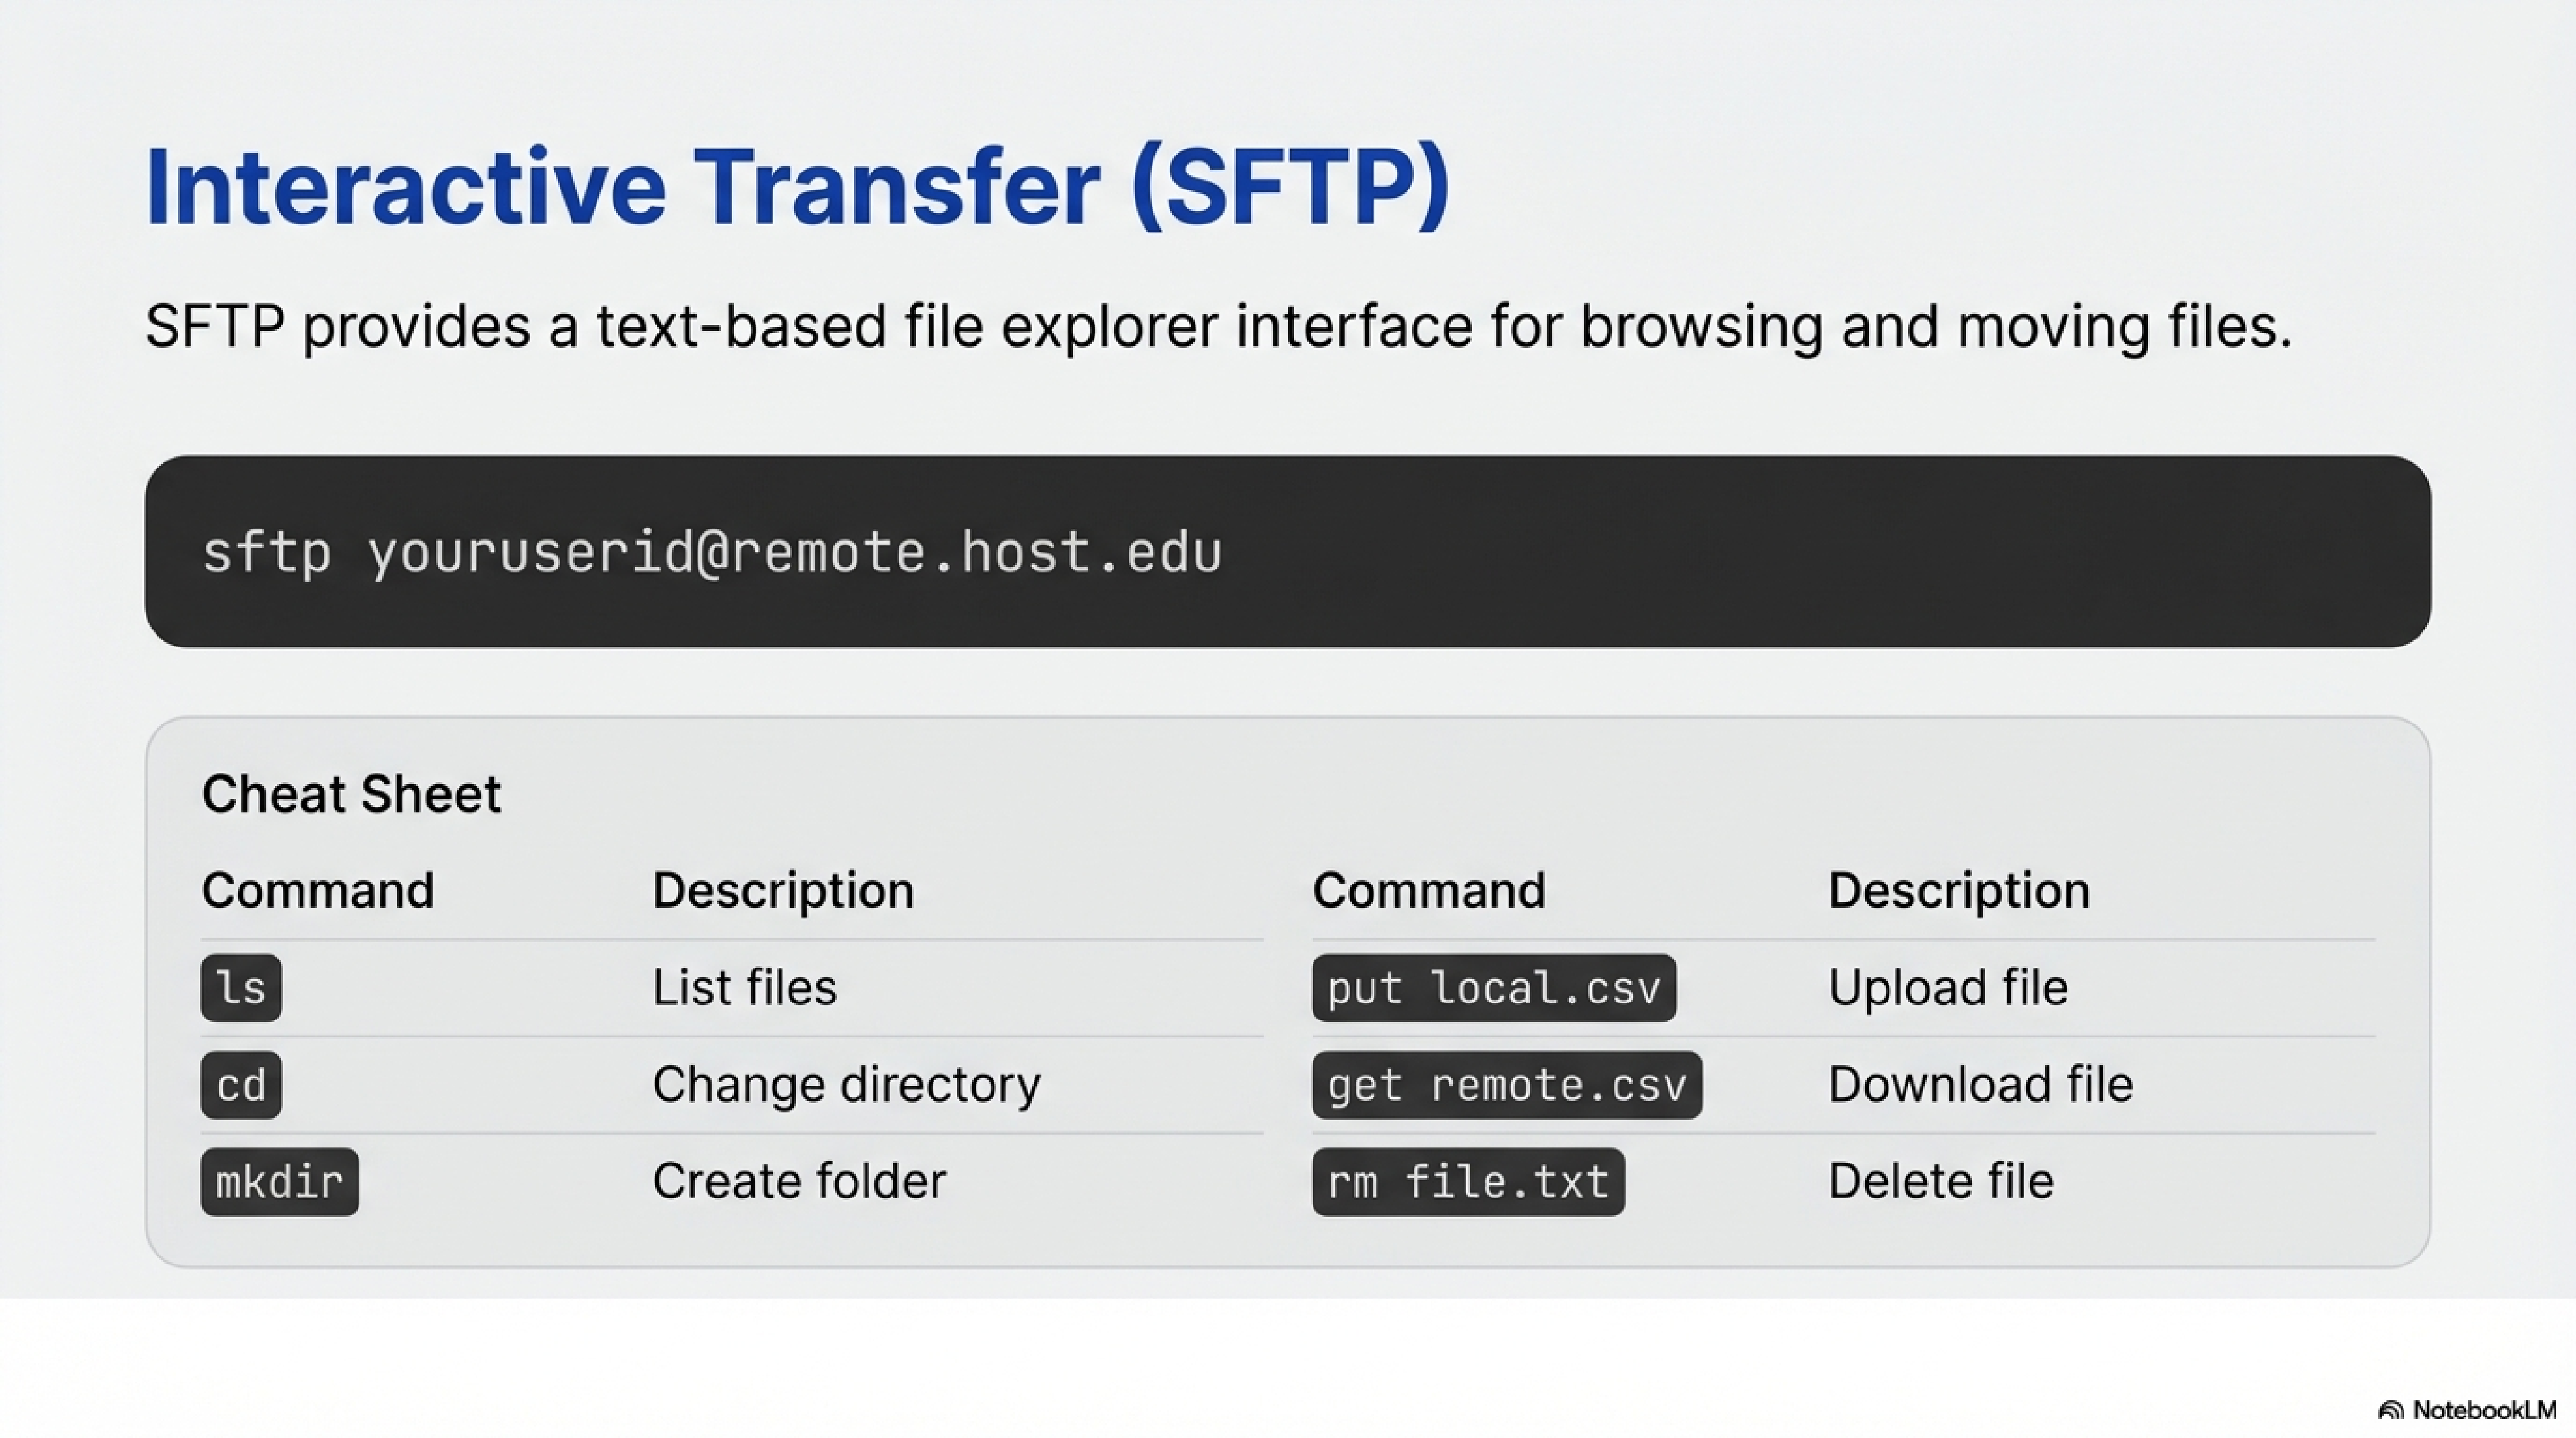
SFTP gives an interactive file-transfer session over SSH.
- You enter:
sftp youruserid@remote.host.edu
- You use commands like
ls,cd,put,get,mkdir,rminside the SFTP prompt.
For example:
sftp> put local_file.csv
sftp> get remote_file.parquet
Prepare your key
You first generate a key as in section 3 and ensure your public key exists:
cat ~/.ssh/id_ed25519.pub
Copy the entire single-line key (starting with ssh-ed25519 or ssh-rsa).
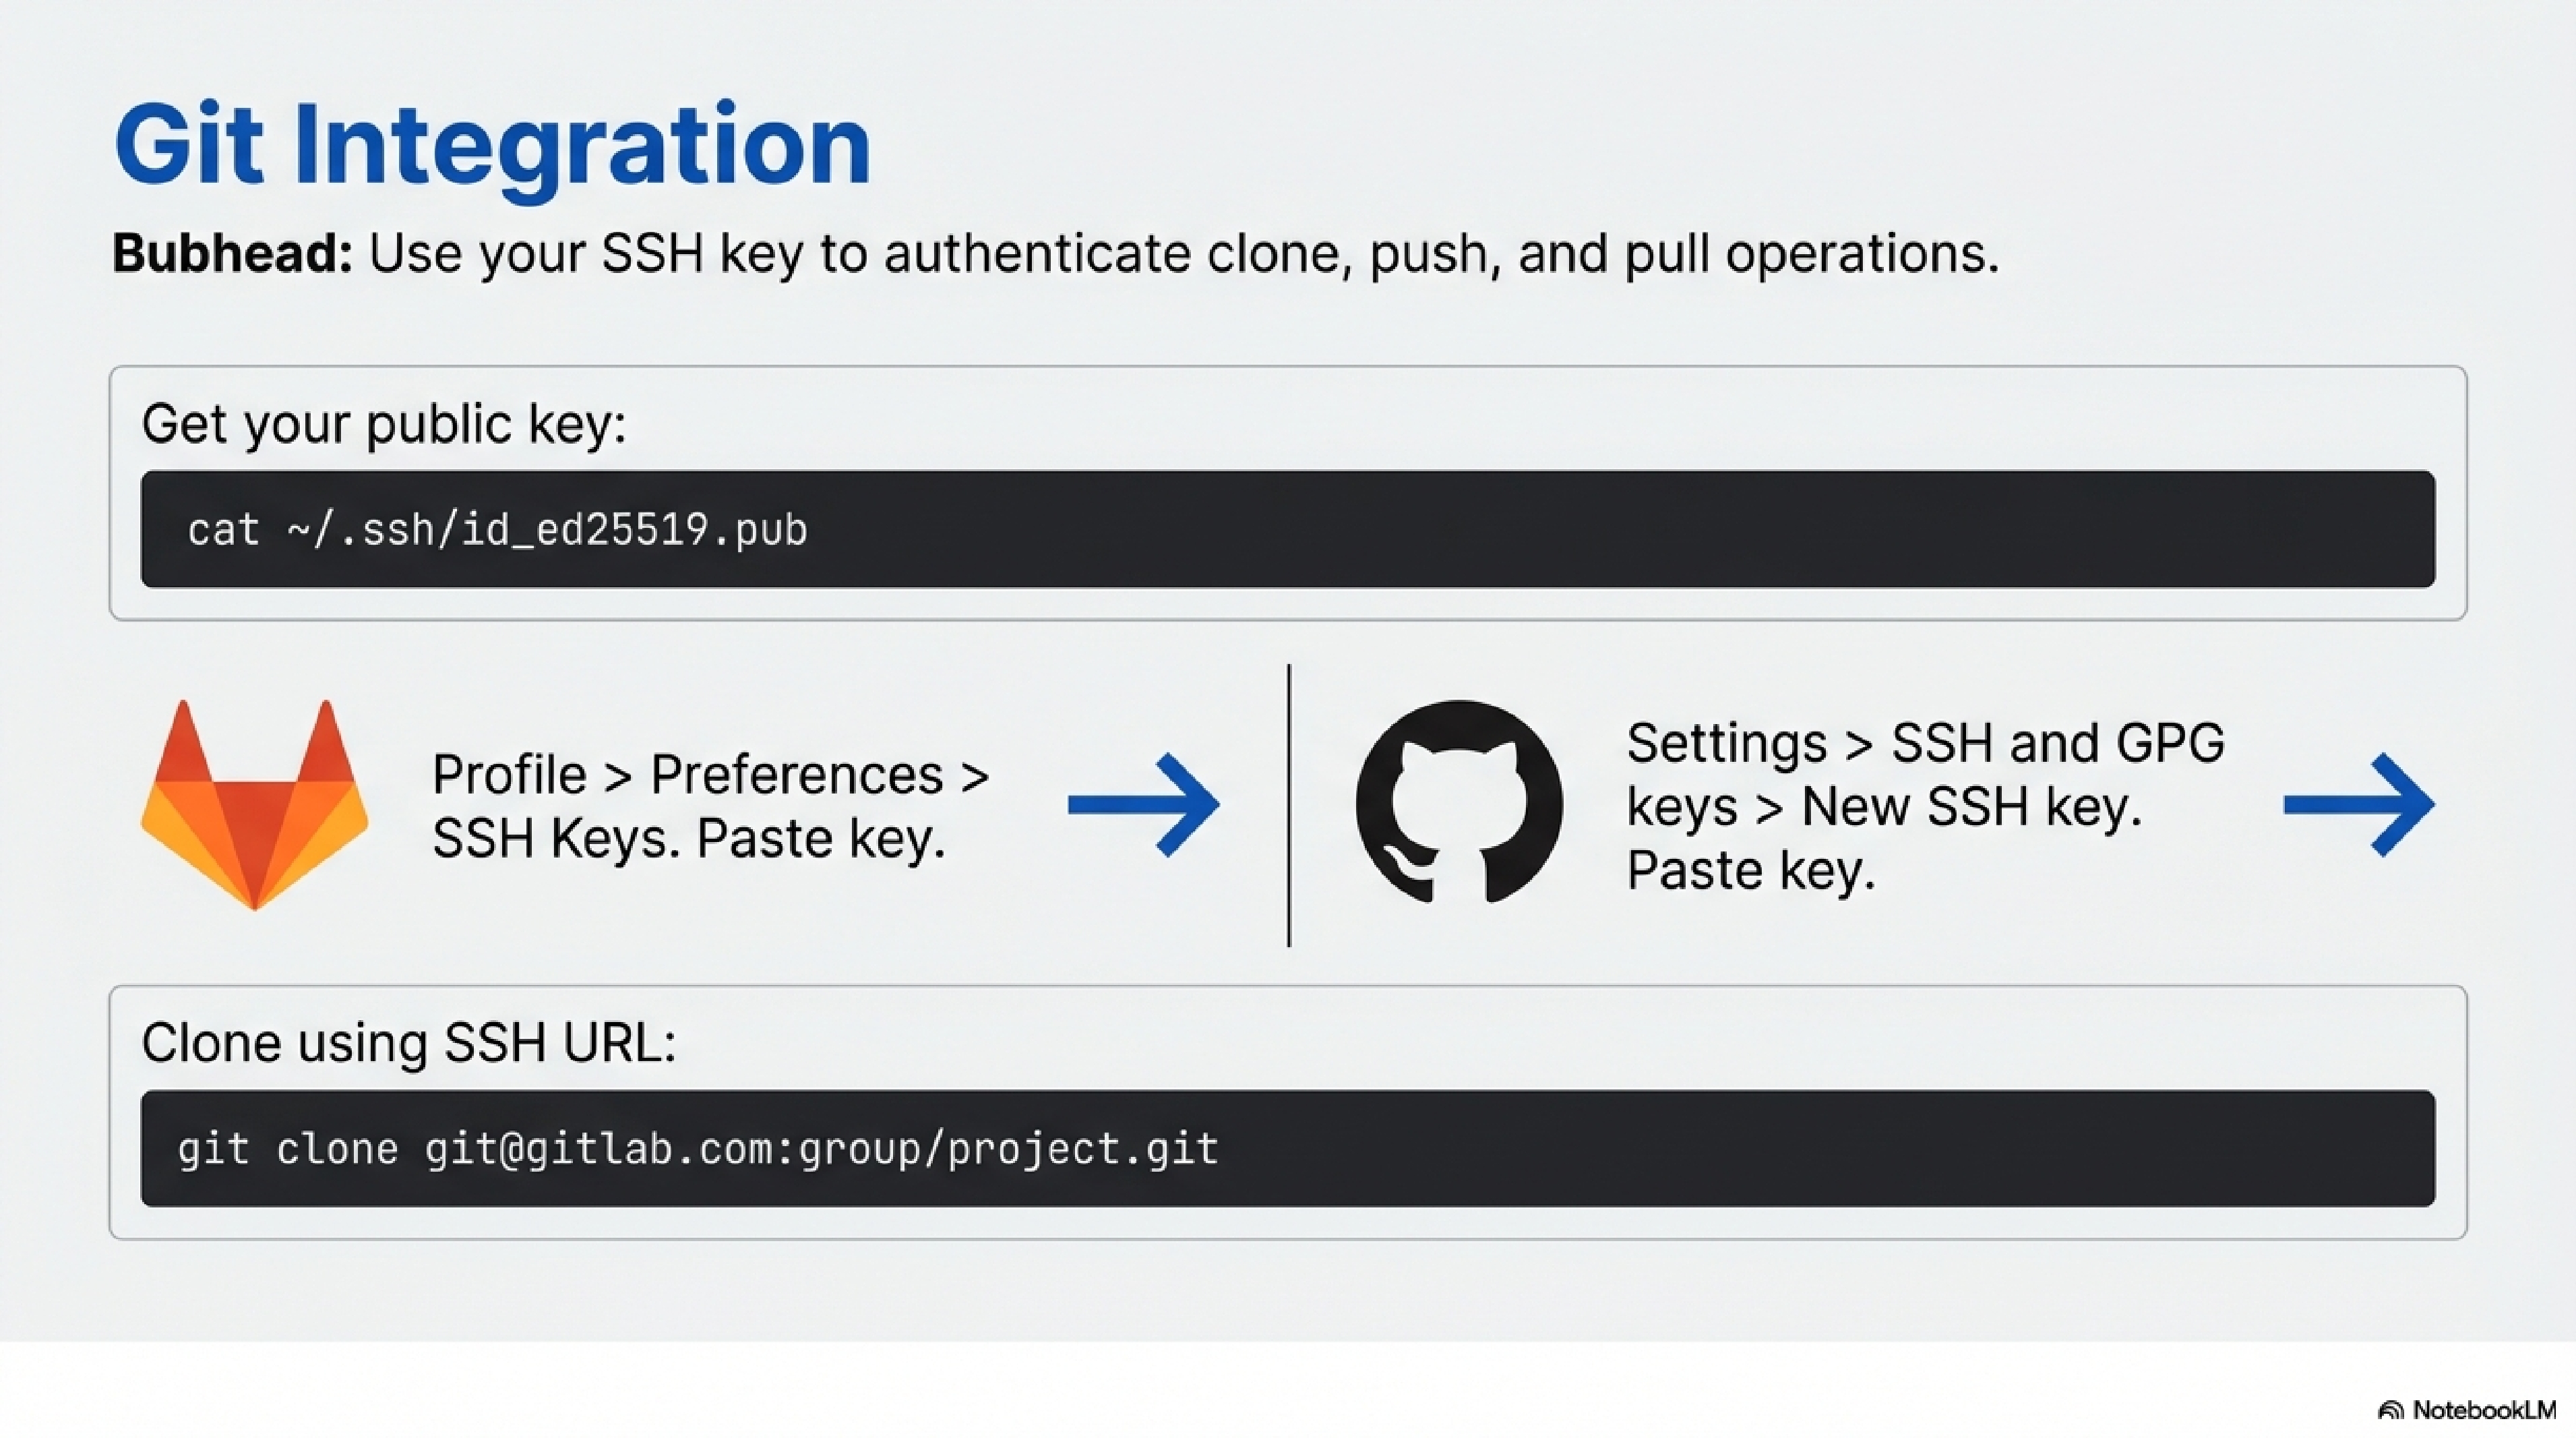
Add key to GitLab
- You log into GitLab via browser.
- You navigate to your Profile → Preferences → SSH Keys (or similar; exact UI can vary).9
- You paste the contents of
id_ed25519.pubinto the key text box. - You optionally give it a title (e.g., “Laptop-2026”).
- You click Add key.
You can now clone via SSH:
git clone git@gitlab.com:group/project.git
Git uses ~/.ssh/id_ed25519 to authenticate.
Add key to GitHub
- You log into GitHub in a browser.
- You go to Settings → SSH and GPG keys.9
- You click New SSH key.
- You paste your public key and give it a descriptive title.
- You save.
You can now use SSH URLs:
git clone git@github.com:org/repo.git
Again, Git uses the same SSH key in ~/.ssh.

For data scientists using many clusters or Git remotes, ~/.ssh/config simplifies commands.
Example:
Host lab-cluster
    HostName remote.host.edu
    User youruserid
    IdentityFile ~/.ssh/id_ed25519

Host gitlab.com
    User git
    IdentityFile ~/.ssh/id_ed25519
Then you can run:
ssh lab-cluster
git clone git@gitlab.com:group/project.git
without repeatedly specifying usernames or key paths.
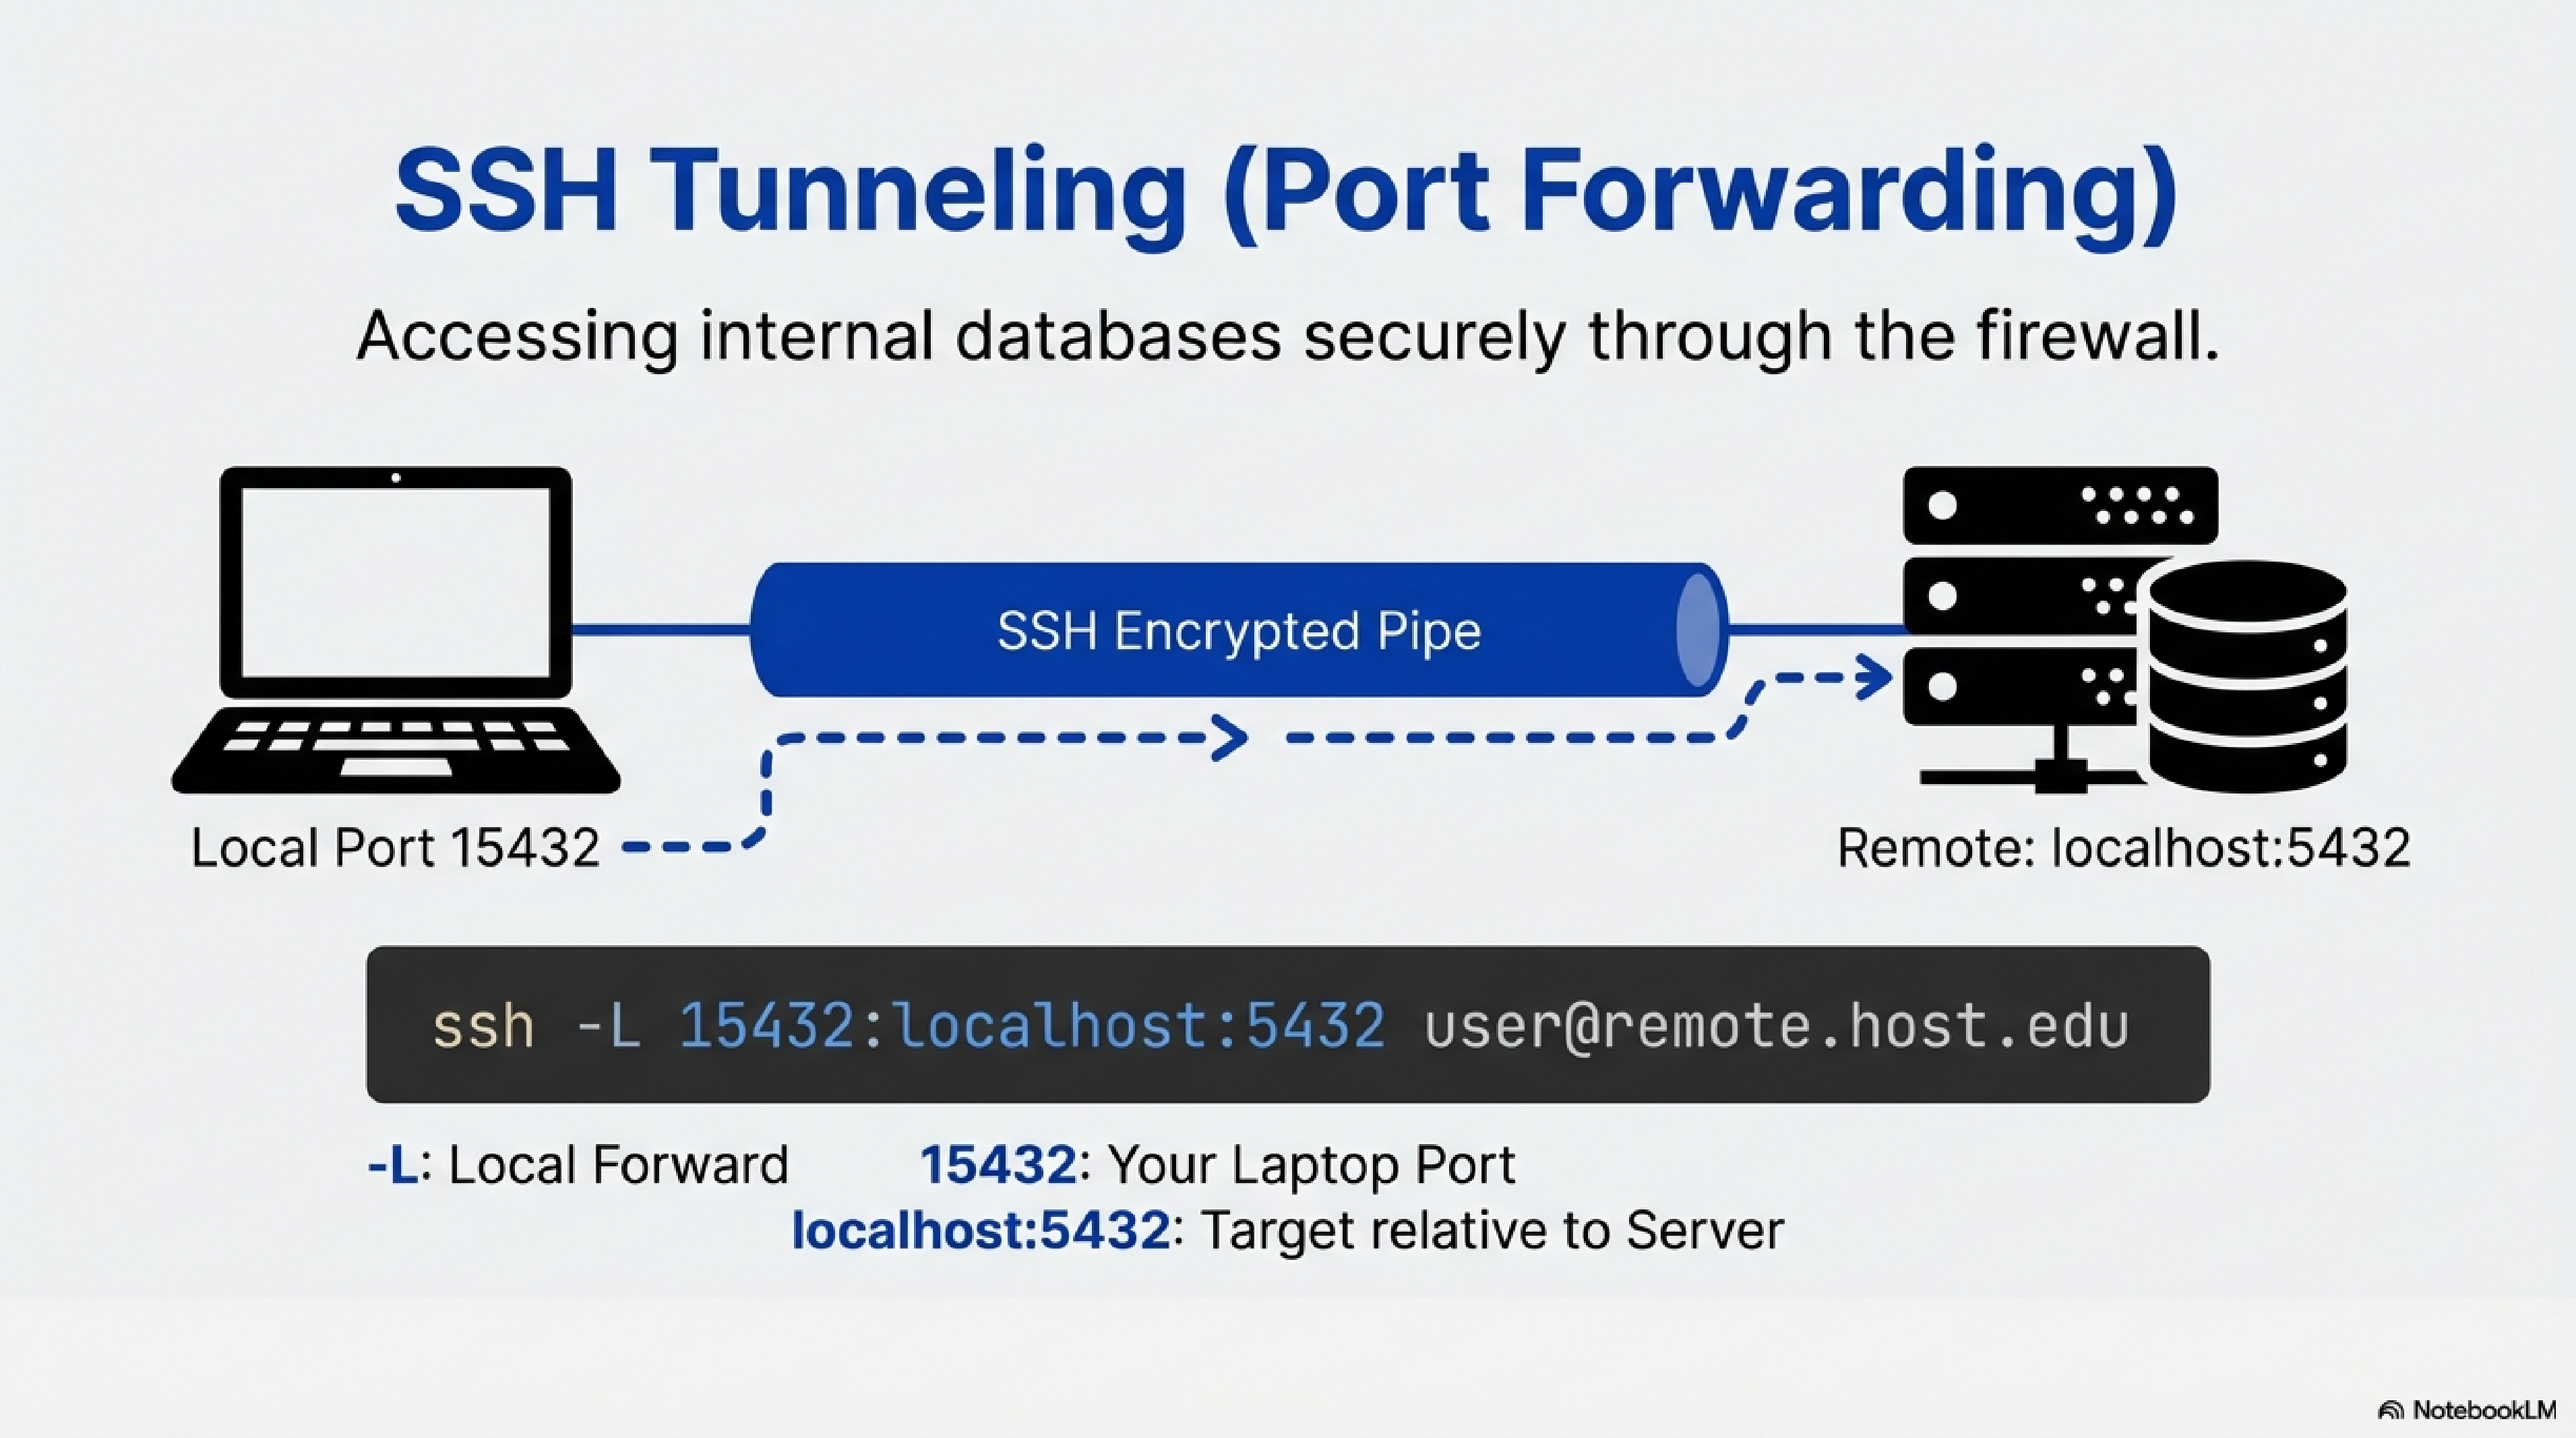
SSH tunneling (port forwarding) lets you securely reach internal services (like a PostgreSQL or MySQL server on a private network) as if they were running on your local machine.101
Concept
- The database server is reachable from the SSH host (e.g., on
localhost:5432from the SSH server’s perspective). - You create an SSH tunnel that forwards a local port on your laptop (e.g.,
localhost:15432) through the SSH connection to the remote database port.1110 - Your desktop client (psql, DBeaver, Python, etc.) connects to
localhost:15432, and the traffic is transparently sent over SSH to the remote DB.1011
Command-line example: local port forward
You enter:
ssh -L 15432:localhost:5432 youruserid@remote.host.edu
15432is the local port on your laptop.localhost:5432is the database host and port from the SSH server’s point of view.
While this SSH session is open, you can connect locally:
psql -h localhost -p 15432 -U dbuser -d mydb
All traffic goes through the encrypted SSH tunnel.
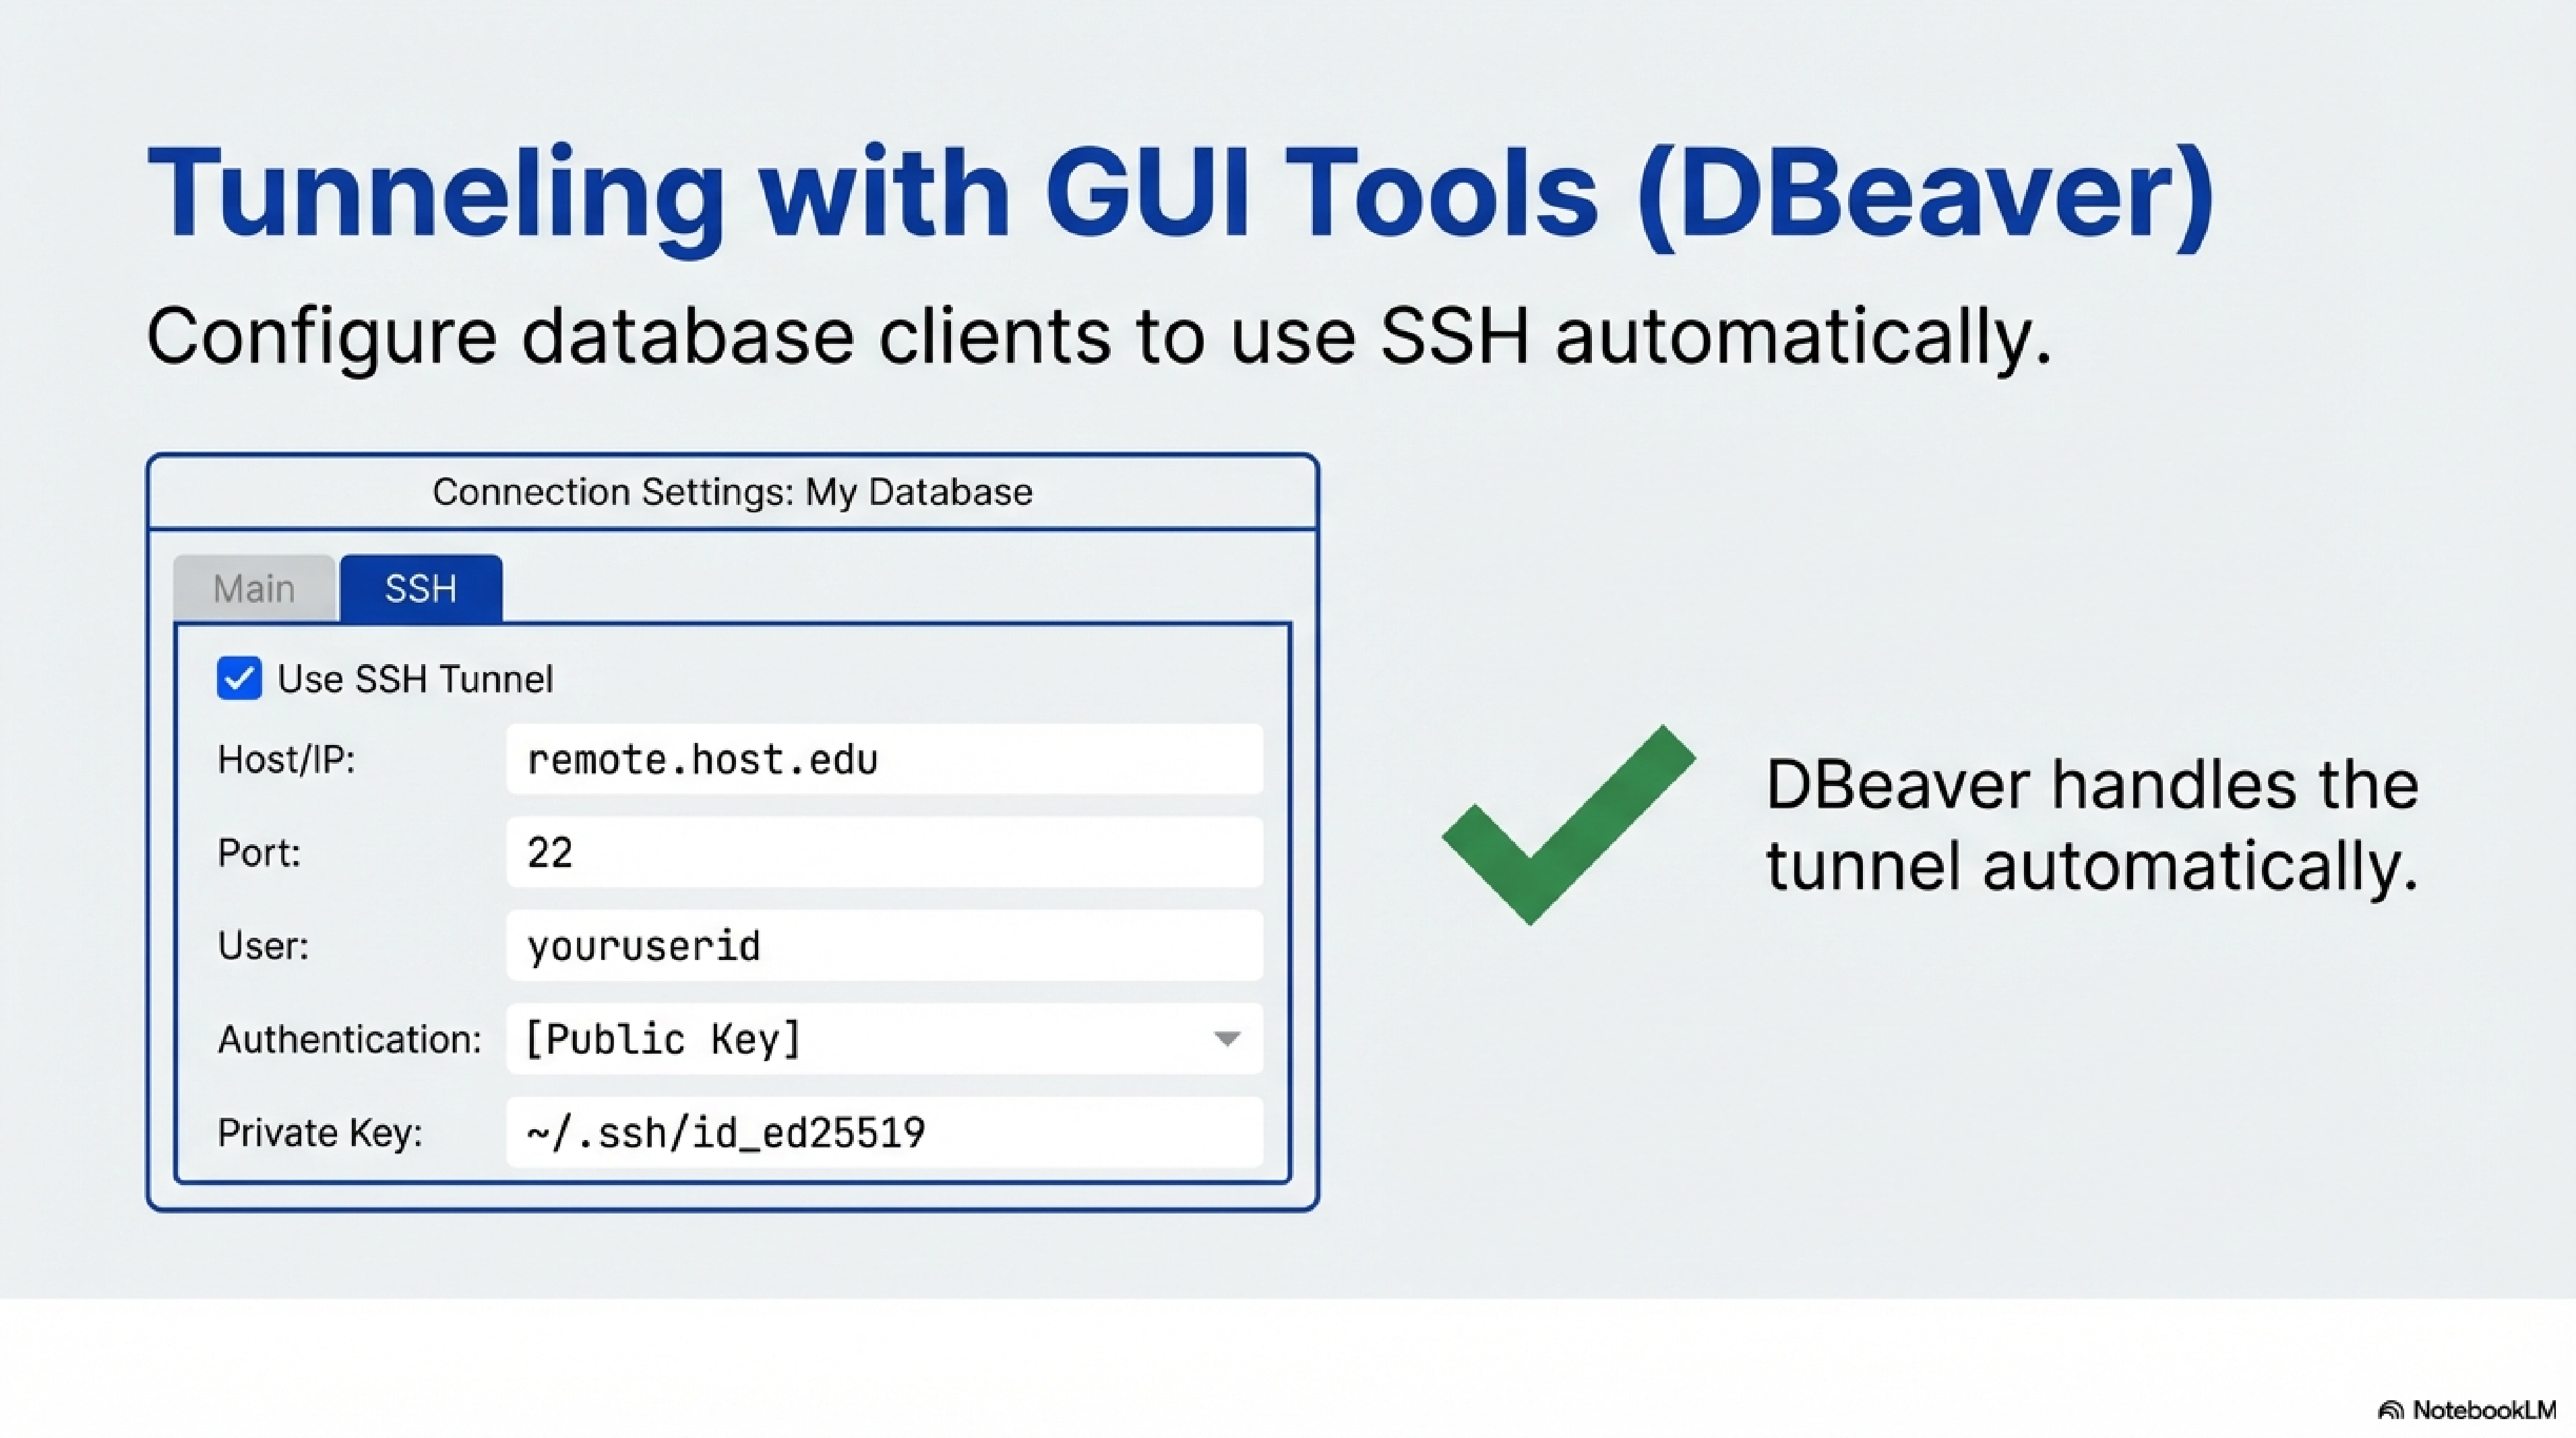
DBeaver and similar GUIs have built-in SSH tunneling.121110
A typical configuration is:
- You create a New Database Connection for your DB type (PostgreSQL, MySQL, etc.).10
- In the main connection settings, you set:
- Host:
localhost - Port: the DB default (e.g., 5432 for PostgreSQL or 3306 for MySQL)
- DB user and password.
- Host:
- You open the SSH or SSH Tunnel tab.
- You enable Use SSH Tunnel.
- You set:
- You click Test tunnel configuration (or similar) to verify the tunnel.12
- You save and connect. DBeaver now automatically creates the SSH tunnel each time and routes DB traffic through it.111210
Many other desktop tools (e.g., DataGrip, PgAdmin in some setups) support a similar SSH tunnel configuration.
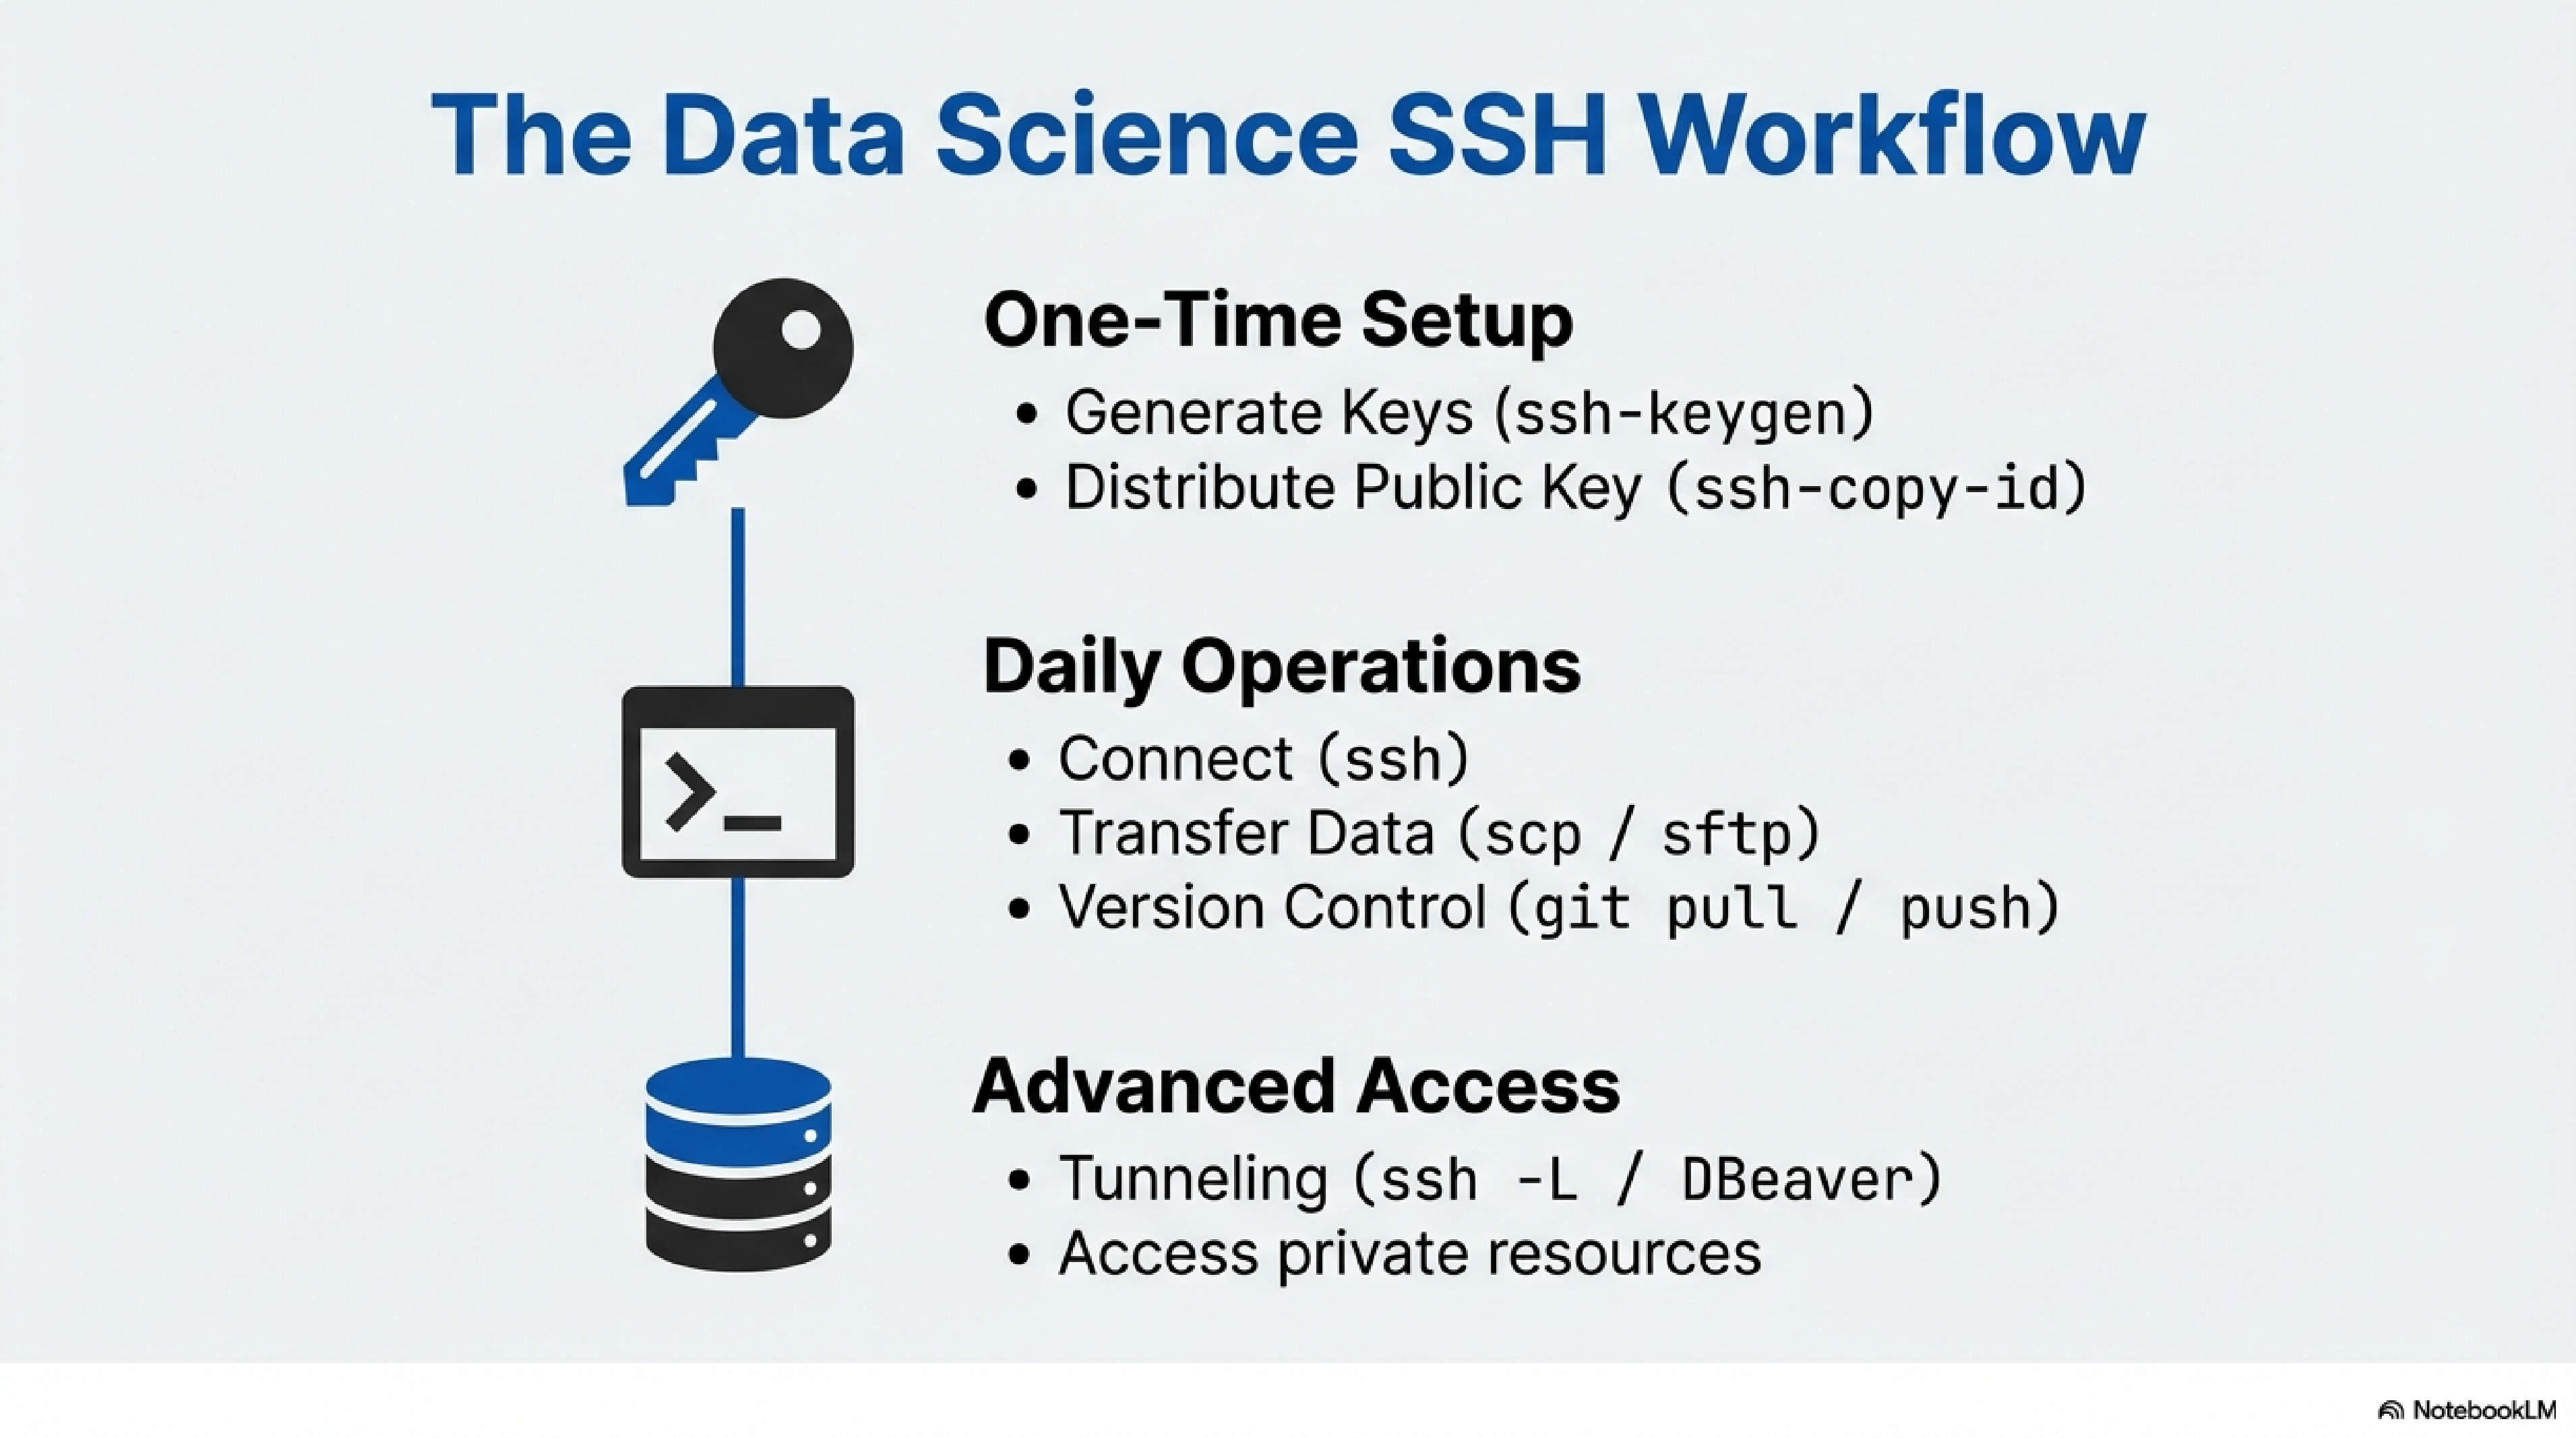
A typical end-to-end workflow looks like:
- You generate an SSH key pair once on your laptop with
ssh-keygen. - You install your public key on:
- Remote Linux accounts (using
ssh-copy-idor manualauthorized_keyssetup). - GitLab/GitHub profiles (for Git over SSH).
- Remote Linux accounts (using
- You use:
sshto get shells and run commands.scp/sftpto move datasets, logs, and model artifacts.- SSH tunnels (CLI or via DBeaver) to access private databases.
Once keys are in place, almost all of this works without re-entering passwords, which is especially useful for repetitive data science tasks and automation.795
https://statistics.berkeley.edu/computing/ssh-keys ↩︎ ↩︎ ↩︎ ↩︎ ↩︎
https://stackoverflow.com/questions/65481470/connect-to-remote-db-with-ssh-tunneling-in-dbeaver ↩︎ ↩︎ ↩︎ ↩︎ ↩︎ ↩︎
https://www.r-bloggers.com/2018/06/connect-mysql-database-with-dbeaver-through-ssh/ ↩︎ ↩︎ ↩︎ ↩︎ ↩︎
https://devimalplanet.com/how-to-dbeaver-remote-database-ssh/ ↩︎ ↩︎ ↩︎ ↩︎
https://www.reddit.com/r/sysadmin/comments/i3on7q/can_someone_explain_how_ssh_key_authentication/ ↩︎